| Notices |
Hello!
Either you have not registered on this site yet, or you are registered but have not logged in. In either case, you will not be able to use the full functionality of this site until you have registered, and then logged in after your registration has been approved.
Registration is FREE, so please register so you can participate instead of remaining a lurker....
Please be certain that the location field is correctly filled out when you register. All registrations that appear to be bogus will be rejected. Which means that if your location field does NOT match the actual location of your registration IP address, then your registration will be rejected.
Sorry about the strictness of this requirement, but it is necessary to block spammers and scammers at the door as much as possible.
|
| Breeding/Egg Production & Care Any topics concerning breeding of the cornsnake, brumation, egg laying, or issues concerning problems in any step along the way. |
How to Make a Simple Reptile Incubator
 03-20-2008, 11:03 AM
|
#1
|
|
|
 How to Make a Simple Reptile Incubator
How to Make a Simple Reptile Incubator
Step-by-Step Process on Creating a Simple and Cheap Reptile Incubator
If you have a clutch of reptile eggs about to emerge, your need for an incubator is immediate. Most chicken egg incubators will not work, because they run to hot. Reptile incubators tend to be expensive, and aren't economical if you have more than one clutch to incubate.
Making a reptile incubator is very simple, and gives you the freedom to make it as hot as you'd like. The cost of making your own reptile egg incubator will vary, depending on the supplies you already own. Nevertheless, the cost will still be less than that of a commercial reptile incubator.
Materials needed:
A full-submersion aquarium heater [$12-$15]
A 10 gallon aquarium [$10]
1 sweater box [$5]
Vermicule [$5]
2 bricks [couple dollars each]
1 thermometer/hygrometer [$5]
Total: approx. $40
After you have obtained the above materials, follow these simple steps:
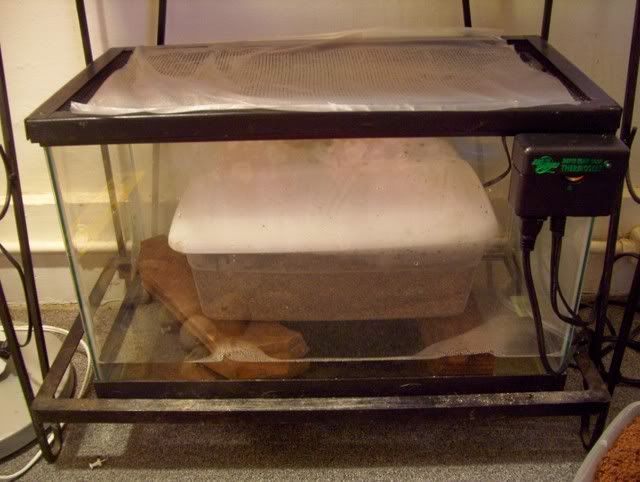
Step 1: Place the two bricks into the aquarium, so that they will serve as two supports elevating the sweater box.
Step 2: Fill the bottom of the tank with water, so that there is approx. a ½ to ¼ inch of the brick not covered.
Step 3: Place the full-submersion aquarium heater completely under the water. Be sure that the heater is meant to be fully submerged! If you not, you will electrocute yourself.
Step 4: Place the sweater box on the bricks above the water. Fill with moist vermiculite. Be sure that it is not wet! It should be damp, but not wet.
Place the thermometer in a visible area inside the sweater box. Drill/punch a few holes in the lid of the sweater box. This is important, so that the eggs get adequate air.
Place the eggs inside the sweater box, and place the lid on. Only secure one side of the lid. Let the other side of the lid rest on the lip without snapping down. This is so that if some condensation collections on the inside of the lid, it won't drip on the eggs - instead, it will run down the slight incline and drip on empty bedding.
Step 5: Finally, place either foil, cellophane, or a piece of glass over the top of the aquarium. Punch a few holes into it, or leave a slight crack at the edge, to allow moisture to escape.
Source = http://www.associatedcontent.com/art...incubator.html
|
|
|
|
|
03-20-2008, 01:28 PM
|
#2
|
|
|
+ Rep for this, nice post. I like that it's a very easy and cost efficient way of incubating a few clutches of eggs. Good for small timers in their first few seasons. 
|
|
|
|
|
03-20-2008, 04:38 PM
|
#3
|
|
|
Good
I'm add this to the List.
|
|
|
|
|
03-20-2008, 04:43 PM
|
#4
|
|
|
You can also get a large cooler and a UTH with a rheostat and do the same thing without the mess of water.
|
|
|
|
|
03-20-2008, 07:12 PM
|
#5
|
|
|
The water seems to work as a buffer to keep the temperature more constant without any spikes. Seems to add a bit of a safety margin.
I made the cooler type incubator with an old used zoomed thermostat and UTH in the bottom, and put several sealed plastic water bottles on top of the uth. Above the bottles is a wire mesh shelf to hold the egg boxes.
I ran that all last season, though with no eggs, and it kept the temp at within 1 degree of 83 the whole time.
|
|
|
|
|
03-21-2008, 10:11 AM
|
#6
|
|
|
 I'm Tryin' it myself..
I'm by no means a breeder, only usually getting 1 clutch a year myself. I'm going to give it a try though, perhaps i'll have a more positive hatch rate. After looking at the list, the only thing I don't have is the "sweater box". All of the other things I do have so it won't be hard to put together, I even have the tank heater in storage in my basement..
|
|
|
|
|
03-21-2008, 12:13 PM
|
#7
|
|
|
I did this, except using an old cooler. Everything else (water included) is the same. So far, temps are very steady, so I'm pretty happy with it.
Now if only I had eggs for the dang thing...
|
|
|
|
|
03-21-2008, 02:14 PM
|
#8
|
|
|
Quote:
Originally Posted by Jrgh17

Now if only I had eggs for the dang thing...
|
 heh, well at least you'll be well prepared!
|
|
|
|
|
03-22-2008, 11:12 PM
|
#9
|
|
|
Made mine today  just in time for the eggs(NormalXBlizzard). just in time for the eggs(NormalXBlizzard).
|
|
|
|
Join
now to reply to this thread or open new ones
for your questions & comments! Cornsnakes.com
is the largest online community dedicated to cornsnakes . Registration is open to everyone and FREE.
Click Here to Register!
|
| Thread Tools |
|
|
| Display Modes |
 Linear Mode Linear Mode
|
 Posting Rules
|
You may not post new threads
You may not post replies
You may not post attachments
You may not edit your posts
HTML code is Off
|
|
|
All times are GMT -4. The time now is 10:15 PM.
|

|