• Hello!

    Either you have not registered on this site yet, or you are registered but have not logged in. In either case, you will not be able to use the full functionality of this site until you have registered, and then logged in after your registration has been approved.

    Registration is FREE, so please register so you can participate instead of remaining a lurker....

    Please be certain that the location field is correctly filled out when you register. All registrations that appear to be bogus will be rejected. Which means that if your location field does NOT match the actual location of your registration IP address, then your registration will be rejected.

    Sorry about the strictness of this requirement, but it is necessary to block spammers and scammers at the door as much as possible.

Who Knew? Getting my craft on!

I'm SO glad you posted this! I came across this thread earlier this week.. I remember when it was posted on iHerp awhile back, but never got to try it. SO, tonight I loaded up on salt and got to baking! Still have to pick up the waterproofing spray (Home Depot doesn't carry it... Bah... So I have to wait til Ace opens tomorrow!), but that's ok... Just step 1 can keep you busy for awhile!

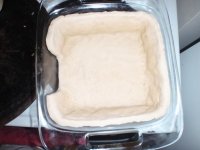
So, for mine, I'm doing a couple sizes. I'm using a muffin pan and an 8x8 cake pan for my molds. The lip on the 8x8 pan is kind of weird, and I didn't want to risk having the bottom all weird and uneven (or, worse, it getting stuck to the pan!), so I decided to try something new: Put the dough INSIDE instead of outside! It was a bit more work getting it off (probably didn't grease it enough), but so far it looks like it works great!

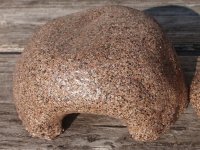
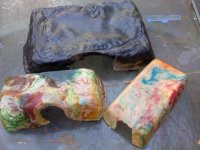
Below are pics of my first 3 muffin tin hides (pre-baking) and the 8x8 (post-bake). I'll get more pics tomorrow as I get them painted! :)
 

Attachments

  • P7110004.JPG
    P7110004.JPG
    37.6 KB · Views: 172
  • P7110003.JPG
    P7110003.JPG
    52.4 KB · Views: 172
  • P7120005.JPG
    P7120005.JPG
    41.5 KB · Views: 172
  • P7120006.JPG
    P7120006.JPG
    49.1 KB · Views: 171
I did some a while back except I used Crayola Clay and they break really easy. I used the tiny bottles of acrylic paint and used several colors blended on them. Super cheap! The bottles of acrylic paint from Hobby Lobby were like .69 each.

I almost used that sand paint, they do look nice.
 
Kathy, that's a cool idea. I'm thinking about doing more "colorful" and less "naturalistic" ones next--will have to see what acrylics catch my eye next time I'm at the craft store.

Anyway, here's mine! Most the little ones I made (the muffin tin ones) ended up being too big for my needs (wee hatchling tubs!)... Oops! Oh well--they're just right for my yearling, and I'm Craigslisting the extra 6 to pay for more hide-making supplies. :)

The 8x8" one is going to be for my yearling boa (still a little-ish guy), just waiting for it to finish airing out.

And I'm not done yet-- I have a loaf pan sized one and about 15 or 16 even littler hatchling-sized ones in the works, and plans to make more. Between my older snakes and the roommate's corns and gecko... Well, let's just say I'm going to be VERY busy over the next week. :D
I'm even trying to devise a way to make one for under my beardie's basking spot, just need to find a big enough mold and find out whether it's safe to put slate tile in the oven... Hmmm!
 

Attachments

  • FinishedProduct1.JPG
    FinishedProduct1.JPG
    83.6 KB · Views: 141
  • FinishedProduct2.JPG
    FinishedProduct2.JPG
    88.6 KB · Views: 142
  • FinishedProduct3.JPG
    FinishedProduct3.JPG
    66.3 KB · Views: 142
Ok. DO NOT skimp on the sealant! Atlas christened his hide last night, so by the time I woke up today, it had been soaking in pee for a few hours or so. Apparently I didn't seal the bottom edge well enough so now it's all gooey. Hopefully it will dry out ok and can be salvaged, but the point is, absolutely make sure every inch is covered. The rest of the seal looks good on mine, it's just that bottom edge...
 
I tryed this and mine turned out a bit flimsy..but for a first attempt not too terrible. I shouldn't have made it so thin and large on the first try, but it was for my ball that goes through ceral boxes every other day so I need a more permanent hide box solution for her. So I'm gonna see how long it lasts and then make some better more creative ones if it works out. Thanks for sharing this great idea!
 
Yeah, I have to work on getting my dough thicker, and I think baking them less and letting them cure (air dry) before painting instead of baking the crap out of them. I think if they are not totally baked in the oven, they can still cure for a few days. I think I baked mine to much - but in my defense they still seemed too soft in the oven and that is why I baked them so long - and then they were too brittle! I still have one (the 8 X 8 brownie pan that Ember is using. It has held up well and he loves it. It's his cool side hide (having the home-made ones under the heat lamp caused the spray paint to bubble up, so I use them on the cool side). Flame is currently using a lava log and a basket. He loves both.
 
I made these yesterday! 5 hides, 3 tiny ones for the tiny ones, and then another in one size up and a size up from that. I need to buy the waterproof coating and stone spray, but that's okay, it'll give these time to dry. I know I baked them longer than what was called for, so hopefully they'll be okay. I'll post pictures when they are done!
 
Also, I used the "metallic texture" spray paint because I couldn't find the stone. Is that safe for snakes once it's dried and aired out? It just smells so strong right now. I don't want to harm them for the silly fact of decorating their cage for my sake. A cardboard tube is just as function, but just not as pretty or fun to make haha. Just double checking
 
I am sure it will be OK. After 3 days OUTSIDE airing out, the spray paint smell was almost totally gone. The stone paint was just as potent. I can't smell it at all now.
 
Here are mine..they look a little lumpy, but they are pretty sturdy feeling my ball pythons seem to like them so far. I will now go make some elaborately decorated smaller ones for the baby corns. These were more or less the test batch, I used food coloring for the two smaller ones.
 

Attachments

  • downsized_0831121834 (1).jpg
    downsized_0831121834 (1).jpg
    32.9 KB · Views: 72
i tried this a few hours ago and it's almost a complete disaster.. i think lower temperature and longer periods should be used instead of higher and for less time.. it got really burned up.. but i made another mistake.. accidentally used self raising flour and the top inflated a bit and when i touched it crashed.. it now has a weird look but i guess for the first try its ok... i used an expired flour i found home after coming back from summer holiday so i didnt waste any money and gained some experience for the next one!
 
I used all purpose flour, not sure if that is self-rising or not! And I really like the ones with the food coloring! Cool idea!
 
Back
Top