Marshall_P
New member
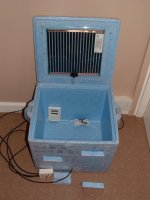
How to Make a Simple Reptile Incubator
Step-by-Step Process on Creating a Simple and Cheap Reptile Incubator
If you have a clutch of reptile eggs about to emerge, your need for an incubator is immediate. Most chicken egg incubators will not work, because they run to hot. Reptile incubators tend to be expensive, and aren't economical if you have more than one clutch to incubate.
Making a reptile incubator is very simple, and gives you the freedom to make it as hot as you'd like. The cost of making your own reptile egg incubator will vary, depending on the supplies you already own. Nevertheless, the cost will still be less than that of a commercial reptile incubator.
Materials needed:
A full-submersion aquarium heater [$12-$15]
A 10 gallon aquarium [$10]
1 sweater box [$5]
Vermicule [$5]
2 bricks [couple dollars each]
1 thermometer/hygrometer [$5]
Total: approx. $40
After you have obtained the above materials, follow these simple steps:
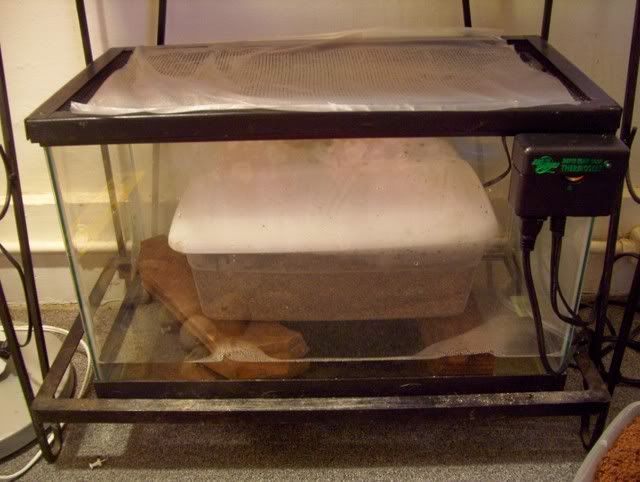
Step 1: Place the two bricks into the aquarium, so that they will serve as two supports elevating the sweater box.
Step 2: Fill the bottom of the tank with water, so that there is approx. a ½ to ¼ inch of the brick not covered.
Step 3: Place the full-submersion aquarium heater completely under the water. Be sure that the heater is meant to be fully submerged! If you not, you will electrocute yourself.
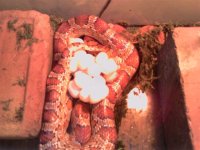
Step 4: Place the sweater box on the bricks above the water. Fill with moist vermiculite. Be sure that it is not wet! It should be damp, but not wet.
Place the thermometer in a visible area inside the sweater box. Drill/punch a few holes in the lid of the sweater box. This is important, so that the eggs get adequate air.
Place the eggs inside the sweater box, and place the lid on. Only secure one side of the lid. Let the other side of the lid rest on the lip without snapping down. This is so that if some condensation collections on the inside of the lid, it won't drip on the eggs - instead, it will run down the slight incline and drip on empty bedding.
Step 5: Finally, place either foil, cellophane, or a piece of glass over the top of the aquarium. Punch a few holes into it, or leave a slight crack at the edge, to allow moisture to escape.
Source = http://www.associatedcontent.com/article/254463/how_to_make_a_simple_reptile_incubator.html
Step-by-Step Process on Creating a Simple and Cheap Reptile Incubator
If you have a clutch of reptile eggs about to emerge, your need for an incubator is immediate. Most chicken egg incubators will not work, because they run to hot. Reptile incubators tend to be expensive, and aren't economical if you have more than one clutch to incubate.
Making a reptile incubator is very simple, and gives you the freedom to make it as hot as you'd like. The cost of making your own reptile egg incubator will vary, depending on the supplies you already own. Nevertheless, the cost will still be less than that of a commercial reptile incubator.
Materials needed:
A full-submersion aquarium heater [$12-$15]
A 10 gallon aquarium [$10]
1 sweater box [$5]
Vermicule [$5]
2 bricks [couple dollars each]
1 thermometer/hygrometer [$5]
Total: approx. $40
After you have obtained the above materials, follow these simple steps:
Step 1: Place the two bricks into the aquarium, so that they will serve as two supports elevating the sweater box.
Step 2: Fill the bottom of the tank with water, so that there is approx. a ½ to ¼ inch of the brick not covered.
Step 3: Place the full-submersion aquarium heater completely under the water. Be sure that the heater is meant to be fully submerged! If you not, you will electrocute yourself.
Step 4: Place the sweater box on the bricks above the water. Fill with moist vermiculite. Be sure that it is not wet! It should be damp, but not wet.
Place the thermometer in a visible area inside the sweater box. Drill/punch a few holes in the lid of the sweater box. This is important, so that the eggs get adequate air.
Place the eggs inside the sweater box, and place the lid on. Only secure one side of the lid. Let the other side of the lid rest on the lip without snapping down. This is so that if some condensation collections on the inside of the lid, it won't drip on the eggs - instead, it will run down the slight incline and drip on empty bedding.
Step 5: Finally, place either foil, cellophane, or a piece of glass over the top of the aquarium. Punch a few holes into it, or leave a slight crack at the edge, to allow moisture to escape.
Source = http://www.associatedcontent.com/article/254463/how_to_make_a_simple_reptile_incubator.html
")