• Hello!

    Either you have not registered on this site yet, or you are registered but have not logged in. In either case, you will not be able to use the full functionality of this site until you have registered, and then logged in after your registration has been approved.

    Registration is FREE, so please register so you can participate instead of remaining a lurker....

    Please be certain that the location field is correctly filled out when you register. All registrations that appear to be bogus will be rejected. Which means that if your location field does NOT match the actual location of your registration IP address, then your registration will be rejected.

    Sorry about the strictness of this requirement, but it is necessary to block spammers and scammers at the door as much as possible.

Maybe overdid it...

backafter30

New member
I have just finished the first two display cages I've ever built. I've been working on them in my spare time for maybe a year and a half, but planning them much longer. They're all hand-built sealed wood with foam insulation carved for scenery. I used the led lights that come on a spool for lighting, and made my own heat panels by sandwiching heat tape between porcelain tiles sealed with silicone. A light switch and a rheostat are built into the front. The first cage has a generic jungle/rock-outcrop theme, with multiple caves and a high roosting space. It all disassembles and comes out for cleaning. The second cage is a jungle of Pandora, Avatar themed cage, using blue and purple toned plants. There are Unobtainium deposits, and, yes, it glows at night. It's daylight now, so I can't get pics of the glowing forest yet. I even painted scenery on the sides and background like you see at zoos, but it doesn't show up well in the pics. Comments, questions, suggestions for improvement welcome. Jim
 

Attachments

  • IMG_5297edit.jpg
    IMG_5297edit.jpg
    333.2 KB · Views: 616
  • IMG_5306edit.jpg
    IMG_5306edit.jpg
    257.1 KB · Views: 612
  • IMG_5298edit.jpg
    IMG_5298edit.jpg
    253 KB · Views: 615
  • IMG_5296edit.jpg
    IMG_5296edit.jpg
    328.7 KB · Views: 616
I'm speechless. Those are gorgeous. I'd love to hear more about how you made them and how you find them once you're using them... because you know some of us are going to be inspired to give this a try now!
 
Totally amazing. I'm inspired. Now all I need is talent, lol. You could probably make a business out of that if you wanted to!
 
Thank you all. I wish I had more time to spend working on enclosures, but there are just too many other things needing done. I have a spreadsheet of ideas for decor themes. I don't even have room for all the ideas I've come up with so far! I would be happy to share in how I've done various things, what worked, what didn't. I have spent so long thinking about the various aspects of these enclosures that I think I've come up with some decent ideas, but time will tell. I do realize that cleaning will be an issue. It all comes apart in sections for cleaning, but that doesn't mean it will be easy. That's what I meant when I mentioned overdoing it. I'd love to make and sell these, and I know there would be at least some market for them, but if I can only make two a year, it won't be much of a business. I'll have to settle for "inspiring" someone else, which is still pretty nice!
 
Any details of methods of construction, materials, philosophy of design, etc., would be appreciated.

IMO what you have done is professional quality. Again congrats on a job well done!
 
Thank you! The details look even better when you downsize the pics for uploading. I am happy to explain anything of interest to anyone, but if I just go off and tell a complete "how I did it" story, it's going to be pretty long, and I'll probably overdo that, too. I'm on here quite often, so ask specific questions, and I'll try to answer them all.
 
I'll start with those luscious rocks. What exactly did you do to make them? What foam, what paint, how and with what did you carve them? How do they open/remove/fit? I'm interested especially if they need your hand built vivarium structure or if one could make them and fit them in an existing viv. Where and how many hides are in them? What is your philosophy when you set the out to design them?

Thanks for any and all info in advance!
 
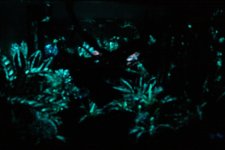
The rocks are made of foam insulation as sold at Home Depot. It comes in 4x8 sheets, about 2 inches thick, and is a light blue color. I was trying to decide which kind to get when a guy down the street set a whole truck load (literally) out at the curb as trash. I don't know what he was using it for, but he had tons of waste, and said I could have it. I had tried carving regular white styrofoam in the past with knives and razors, but the little tiny balls that it is made of went absolutely everywhere, and stuck to everything with static cling you wouldn't believe. A shop vac with a bag was the only way to clean them up. This light blue foam was also a pain to cut, but not quite as messy. Then I got a hot-wire cutter from Amazon: http://www.amazon.com/Proxxon-27082...36739959&sr=8-6&keywords=hot+wire+foam+cutter . It isn't perfect, but it does work. You can bend the hot wire into different shapes and pull it through the foam, creating really nice forms. I glued the layers together with Gorilla Wood Glue, then carved them all at once. Keep the glue thin, as it's harder to cut. I studied internet photos of rock outcrops until I felt I knew the effect I was going for, then attempted to recreate this in foam. My skill just isn't that good. I went through tons of foam trying to achieve a specific look, then just ended up "winging it". Once I set aside my preconceived ideas of what it should look like, I just carved randomly. And it worked! I painted everything with a satin black enamel paint, like I used on the outside of the enclosures. Then I used regular acrylic craft paints to wash them in a few shades of gray, a little brown, and then some green. A few more dabs of glue and some dead sheet moss that I bought was the final touch. I did add a bit of green paint to highlight the moss some. (It was dead, not preserved)

My daughter has the only decent camera in the house, and she's not around right now. I'll have to wait for her to get pics of how it comes apart, but I really just built it in sections, all fit together. There are half a dozen hides in each enclosure, some high, some low, some with a heat source, some colder, and one with a plastic container with damp cypress mulch inside. I've read that cypress is harmless to reptiles and resistant to mold.

My philosophy? That's deep. Ok, if the cage doesn't meet the snakes requirements, it isn't worth having, and if it doesn't meet yours, you won't want to have it. I probably made both of these too complicated, and definitely too small for the species I've put into them to start with. My Baron's Racers will outgrow them quickly, and I"ll have to look for something smaller to put in there. My Blue Barons is just perfect, though, for the Avatar themed one!
 
What did you use to seal the foam insulation/paint to make it washable? Can it be scrubbed or soaked? I have some carved foam shelves in my cages. I love how they look, they work great, but as soon as I try to wash them they just absorb the water and take forever to dry. And forget about scrubbing, the foam kind of disintigrates if I try that.
 
Wow, I'd have never have guessed it was that blue foam. Thanks for your very complete answer. Your philosophy is basic but very sound :).

I too am looking forward to finding out how to clean it. Thanks again!
 
That blue foam is really not at all like the white foam made of little balls stuck together. It is more of a foam plastic. When you drag the hot wire through it, it melts and hardens like, well, plastic. My original intent was to coat every piece with tile grout and sealer. That way it would be durable and waterproof. Once I saw how the foam melted, I changed my mind. I tried to seal the porosity with the base coat of enamel paint. Some of it soaked in, but a lot of it just sat on top and took forever to dry. On one hand I was concerned that it might peel off, but the texture seemed rough enough to "grab" the paint. I don't think you could soak the foam pieces, as they would just float on top. I know the acrylic craft paint is not known for ultra-durability, but I think I can use a soft-bristle brush. On another project I created years ago, the flat sealer I put on top of the paint gave it an unnatural sheen. The craft paint was nice and flat, like I wanted it so I left it alone. I guess if it flakes off, I can always do some touch-ups.

No one asked me about the vines in the Avatar cage. I was kinda proud of those. It's soaker hose! I bought a 50ft 1/2" garden soaker hose, and a roll of 1/4" mini soaker hose, used for irrigation. I cut them to length, then inserted some thick coat-hanger wire through them so they'd be bendable and strong. I painted the hoses brown (really soaked it up), then dabbed on some waterproof wood glue and rolled them in sphagnum moss to add texture. Add little pieces of sheet moss, highlighted with green paint, then use thin green florists wire to attach a few small leaves. To mount them, I just drilled holes in the ceiling, stuck the coat-hanger wire through, and bent it over.

My shelves aren't styrofoam either, they're something else. I think they are an expanding foam poured into a mold. I am going to try to find the foam you are talking about. I just bought two more cages and would rather try to make something myself than buy more shelves that are really expensive and don't clean well. :)

The vines are really cool. Now that you mentioned them I went back and took another look. I really like how they turned out!
 
I'm sure I've never fascinated anyone at all, but I do have plenty of ideas and untested information. Use at your own risk.:D
 
A few more pics. Closeup of my green Baron's, and a couple of the glow-in-the-dark jungle. This was taken in complete darkness, with only the light from the plants, which is why it is blurry. Even with my daughters nice Canon camera and a tripod, it's just too little light. In person, it is totally cool and downright eerie looking. My blue Baron's refused to pose, but was draped in the vines earlier and just looked killer!
 

Attachments

  • IMG_5387edit.jpg
    IMG_5387edit.jpg
    177 KB · Views: 197
  • IMG_5392edit.jpg
    IMG_5392edit.jpg
    159.2 KB · Views: 192
  • IMG_5393edit.jpg
    IMG_5393edit.jpg
    160.8 KB · Views: 194
Back
Top