CornSnakes.com Forums  
  Tired of those Google and InfoLinks ads? Register and log in!

Go Back   CornSnakes.com Forums > The CornSnake Forums > DIY Projects
Register FAQ Members List Calendar

Notices

DIY Projects Use this forum to post threads related to home made projects for your corns... Vivariums, hides, decorations, accessories, you name it. Anything to save some bucks or give your personalized touch.

DIY: Great Stuff Foam Terrarium Background
Reply
 
Thread Tools Display Modes
Old 09-11-2008, 09:37 AM   #1
TripleMoonsExotic
DIY: Great Stuff Foam Terrarium Background

NOTE: This terrarium is made of a 45g split into two sections with an acrylic divider. You will need more or less materials depending on what size tank you are using. Before actually attaching the peat moss (or any other organic material), I highly suggest microwaving or baking it to ensure all little nasties are killed.
________________________________

BASE LAYER

Materials
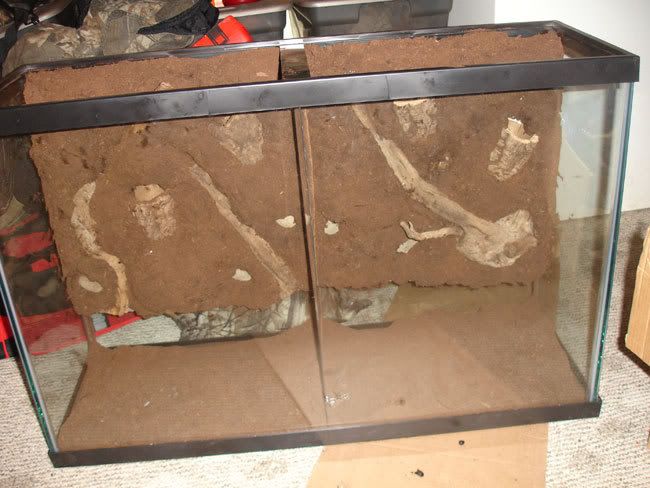
(2) cans of Great Stuff foam insulation
(3) pieces of driftwood
(6) river rock stones
(4) pieces of cork bark
(4) compressed peat moss planters


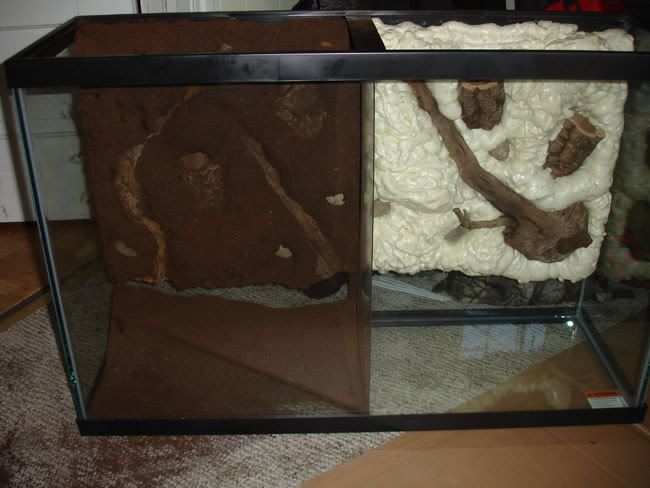
I first sprayed a layer of Great Stuff foam down onto the back of the enclosure. I left 3-4" on the bottom for my drainage and substrate layers. Before the Great Stuff foam dried, I placed my driftwood and river rock where I wanted it. For planting small vines and other plants, I also placed compressed peat moss planters into the Great Stuff and hid them with pieces of cork bark. I let the first layer of Great Stuff sit for about 2 hours before going back and adding another layer to secure my decorative wood and rock and add more depth to the background.
________________________________

CREATING THE TEXTURED BACKGROUND

Materials
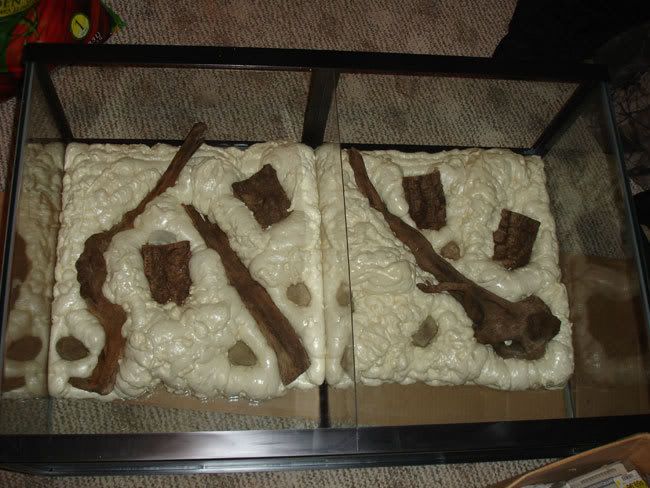
(4) tubes of black Silicone II window & door caulk
(1) bag of peat moss

Tools
Vacuum


After allowing the Great Stuff to set for 12 hours, I tugged on the wood to see how secure the pieces were staying in. They aren't budging! For this part I used 2 tubes of caulk per side, and now my arm hurts from using the caulk gun so much yesterday! Anyway, starting from the bottom of the background, squeeze generous amounts of the black caulk in about 6" square sections. I used plastic knifes to spread the caulk around like peanut butter. Take handfuls of the peat moss and press it into the silicone before it dries. Keep doing this until the entire back is covered, let set for 12-24 hours.


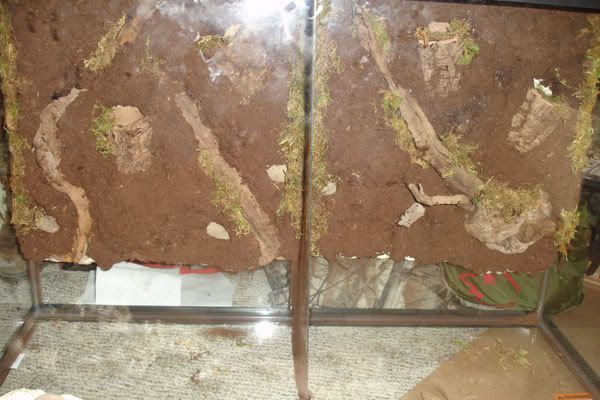
After letting the silicone and dirt set, I figured out a little trick to make sure that any spots I missed were found right away and fixed. After sitting the tank up and knocking the bulk of the extra off, I used my vacuum hose and ran the end about 1/2" from the background. This sucks off any loose dirt and will expose any bare spots. It will not harm the sections that are securely held in place with the silicone. Once bare spots are found, just use a bit of silicone and press the dirt in. I did this 3 times to make sure ALL spots were covered.
________________________________

ADDING MORE DEPTH

Moss:

More Pictures Coming Soon...
 
Old 09-11-2008, 10:04 PM   #2
doortech9
Great idea! I used to think exo terra backgrounds were nice, but after seeing how easy it is to make a Realistic background i wont be looking for one anymore. Coool
 
Old 09-11-2008, 10:41 PM   #3
LBoz
What's an exo-terra background? Foam?

TME, I really like this design. To be honest, I didn't at first, but you've taken it a step that I've not seen before with the peat and the moss. I think there's really a lot you could do with this as a starting point, too. Do you think branches sticking out from the foam would hold the weight of an average corn? King? It seems that one it dries, it might not give a lot of support for an end heavy branch. I have you tried this at all?

I think the added moss really makes the whole thing "pop" in depth and color as well. And what's so great about the foam is that you an tack in different plants and silicone them in place. Even just a staple gun should work so you can have hanging vines and such.

Nicely done, TME. How long did the whole project cost you in time? And where oh where did you get the black silicone?? I can't find that stuff anywhere!

I really wish I'd not lost my pc that all my photos of my project on it. It's also a very simple piece and would be made even easier had I not had to make it marine safe.
 
Old 09-11-2008, 11:34 PM   #4
Jimmysan00
DIY: Make a fake rock cave

http://www.instructables.com/id/Make...r-a-reptile-c/

Here's a link using the same materials to make a sweet cave, and basking spot for any reptile.
 
Old 09-11-2008, 11:36 PM   #5
TripleMoonsExotic
Quote:
Originally Posted by LBoz View Post
What's an exo-terra background? Foam?
Yes, they are foam backgrounds.

Quote:
Originally Posted by LBoz View Post
TME, I really like this design. To be honest, I didn't at first, but you've taken it a step that I've not seen before with the peat and the moss.
Thanks. It's actually all setup and housing animals now...But I keep killing the plants I put in. My most recent plant victim is a bush of "baby tears." Once I have it all planted and thriving I'll post pictures of it completed. I think I'm going to give in and put an order in with Black Jungle.

Quote:
Originally Posted by LBoz View Post
Do you think branches sticking out from the foam would hold the weight of an average corn? King? It seems that one it dries, it might not give a lot of support for an end heavy branch. I have you tried this at all?
The wood that is sticking out of my background could no doubt hold an adult Corn (I haven't tested it, but I bet it could hold an adult BP). The wood won't budge no matter how much I tug on it.

Quote:
Originally Posted by LBoz View Post
How long did the whole project cost you in time? And where oh where did you get the black silicone?? I can't find that stuff anywhere!
Not including my plant issues, it took me about 72 hours to put the background together (giving time to dry between layers). I found black silicone at Lowes where all the other silicone is. You have to look closely at the tubes, they actually have quite a few different colors. Next time I'm in Lowes (which might be this weekend, we need to pick up some trim) I'll take a picture of the tube.
 
Old 09-12-2008, 08:11 AM   #6
Drewby07
NICE! FYI I once made a 5' tree using this same method for an exhibit at the local science museum where I volunteered. We made a 2x4 frame, covered it in chicken wire and then foamed / mossed it. It went into a huge viv that was big enough for me to walk in....I wonder if it's still there?

The point is...this stuff is STRONG....and will basically last forever. We had bromeliads and spanish moss growing all over it and it really did look real...
 
Old 09-12-2008, 09:00 AM   #7
TripleMoonsExotic
Quote:
Originally Posted by Jimmysan00 View Post
Here's a link using the same materials to make a sweet cave, and basking spot for any reptile.
How about you post this in its own thread instead of sticking it in my DIY? It's a completely different method.
 
Old 10-25-2008, 11:51 PM   #8
dwyn127
I've used that product myself for quite a few projects. Nice job coming up with a new use.

It really is great stuff!
 
Old 10-26-2008, 09:52 AM   #9
Chip
How do you keep it to adhere? I have pics buried somewhere of trying to make a great stuff background that I painted with Krylon Fusion. In three days, it just "fell" off the glass in one piece! I never tried it again, but figured you must need to score the inside glass or something.
 
Old 10-26-2008, 10:33 AM   #10
alan
How is this working out cleaning wise? I need some background in my snake's viv but I don't want to make it a pain to clean.
 

Join now to reply to this thread or open new ones for your questions & comments! Cornsnakes.com is the largest online community dedicated to cornsnakes . Registration is open to everyone and FREE. Click Here to Register!

Google
 
Reply


Posting Rules
You may not post new threads
You may not post replies
You may not post attachments
You may not edit your posts

BB code is On
Smilies are On
[IMG] code is On
HTML code is Off


All times are GMT -4. The time now is 06:15 PM.


Fauna Top Sites
 

Powered by vBulletin® Version
Copyright ©2000 - 2024, Jelsoft Enterprises Ltd.
Page generated in 0.04434299 seconds with 10 queries
Copyright Rich Zuchowski/SerpenCo