-
Hello!
Either you have not registered on this site yet, or you are registered but have not logged in. In either case, you will not be able to use the full functionality of this site until you have registered, and then logged in after your registration has been approved.
Registration is FREE, so please register so you can participate instead of remaining a lurker....
Please be certain that the location field is correctly filled out when you register. All registrations that appear to be bogus will be rejected. Which means that if your location field does NOT match the actual location of your registration IP address, then your registration will be rejected.
Sorry about the strictness of this requirement, but it is necessary to block spammers and scammers at the door as much as possible.
You are using an out of date browser. It may not display this or other websites correctly.
You should upgrade or use an alternative browser.
You should upgrade or use an alternative browser.
How to make your own Rheostat for less than $7! Detailed instructions.
- Thread starter DdotSpot
- Start date
DdotSpot
The Snewbie
Well...Joe,
Is there anything that is 100% safe?? I will say a couple of things.
1. I would say that this is JUST as safe as a regular Rheostat that you would buy at the store...if you'll look carefuly....THERE IS NO GROUND. In fact...I would probably say its safer(Read point number 2)
2. I made sure to STRONGLY suggest people using electrical tape around all connections...and even the outside of the box.
I would like to add, there was never any mention of keeping this Rheostat on the floor. Actually, this design is very easy to insert into your rack system or just place on the shelf next to your viv.
DdotSpot
The Snewbie
Ok, to satisfy the anticipation...Part deux
Ok, too many folks wanted me to post instructions for another design that included a receptacle outlet. These instructions aren't as detailed, but just use the previous instructions as a guide.
Ok...here are the 'supplies' you'll need

STEP 1:
Cut the extension cord like you did last time. But take this piece and throw it away...we won't be using it.
STEP 2:
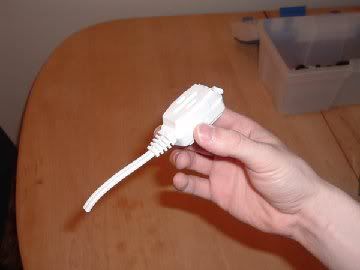
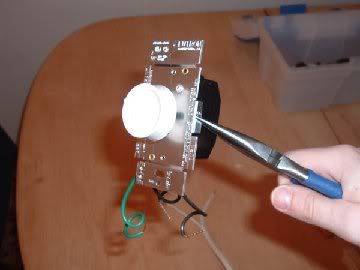
If your dimmer has these little tabs on the side...you will need to remove them in order to fit it in the box. Use your pliers to work those tabs off.
STEP 3:
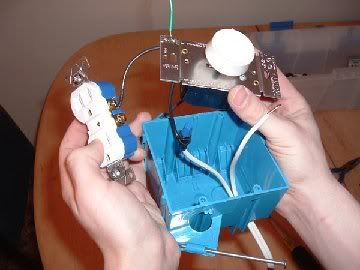
Connect ONE of the wires off of the dimmer onto one of the GOLD screws located on the receptacle. It doesn't matter which black wire or which gold screw you put it on. RECOMMENDATION: try to keep everything 'clockwise'. Wrap the wires around screws clockwise so that they don't slip off when you screw it on. Also, take the OTHER black wire and connect it with the side of the extension cord that DOESN'T have the ridges on it.(look at the first instruction manual about the 'ridges' on the wire)
STEP 4:
Connect the RIDGED side of the extension cord around one of the WHITE or SILVER screws on the receptacle.
STEP 5:
Ok...you can actually connect the green wire to something in this design....not that it will really do anything...
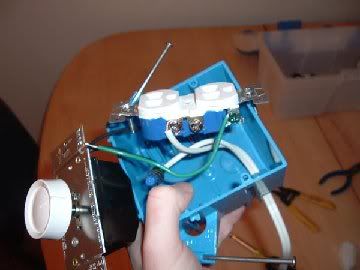
STEP 6:
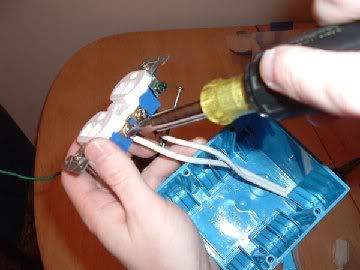
For safety sake....JOE...I would wrap the receptacle with your electric tape.
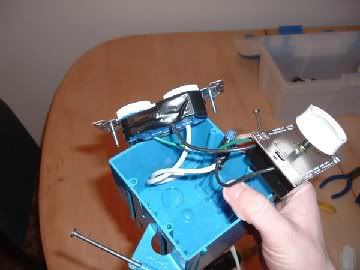
That's basically it...now just screw in the receptacle and the dimmer into the box...and put the cover on! YOUR DONE.....
Ok, too many folks wanted me to post instructions for another design that included a receptacle outlet. These instructions aren't as detailed, but just use the previous instructions as a guide.
Ok...here are the 'supplies' you'll need
STEP 1:
Cut the extension cord like you did last time. But take this piece and throw it away...we won't be using it.
STEP 2:
If your dimmer has these little tabs on the side...you will need to remove them in order to fit it in the box. Use your pliers to work those tabs off.
STEP 3:
Connect ONE of the wires off of the dimmer onto one of the GOLD screws located on the receptacle. It doesn't matter which black wire or which gold screw you put it on. RECOMMENDATION: try to keep everything 'clockwise'. Wrap the wires around screws clockwise so that they don't slip off when you screw it on. Also, take the OTHER black wire and connect it with the side of the extension cord that DOESN'T have the ridges on it.(look at the first instruction manual about the 'ridges' on the wire)
STEP 4:
Connect the RIDGED side of the extension cord around one of the WHITE or SILVER screws on the receptacle.
STEP 5:
Ok...you can actually connect the green wire to something in this design....not that it will really do anything...
STEP 6:
For safety sake....JOE...I would wrap the receptacle with your electric tape.
That's basically it...now just screw in the receptacle and the dimmer into the box...and put the cover on! YOUR DONE.....
babbaloo99
New member
Thanks Dan!
These are my kind of instructions! I have one question about the second version you posted. Can you plug two UTH's into both outlets as a dual rheostat?
By the way, my dad used to do auto body work so his favorite type of band aid was electrical or duct tape
These are my kind of instructions!
I have one question about the second version you posted. Can you plug two UTH's into both outlets as a dual rheostat?By the way, my dad used to do auto body work so his favorite type of band aid was electrical or duct tape
princess
Cornaholic
Wow Dan, wow-wow-wow....I never figured it would be so simple. I'm pretty competent but I get nervous any time I'm dealing with anything that could potentially electrocute me (I kinda owe my life to a saftey cut-off switch)..
Brilliant instructions...but I'll get my very handy boyfriend to do it for me!
Brilliant instructions...but I'll get my very handy boyfriend to do it for me!
DdotSpot
The Snewbie
babbaloo99 said:These are my kind of instructions!
Yes you can...If you plug in 2 UTHs, the one knob will control both outlets. There's only one potential problem that I can forsee. The temps will likely still vary because of a couple of factors: Substrate depth and types AND different UTHs. I would still keep thermometers monitoring the temps just to be sure that all is well
Other than that, it should work great.Thanks for the great post! One question, though. I'm putting one of the second type together, and if I have an extension cord that has a ground wire can I just go ahead and twist it together with the groud from the dimmer and connect them both to the ground screw on the outlet? Thanks!
Thanks for confirming my grounding plan. This is the first electrical project I've ever undertaken so I wanted to make sure. Now, all that's left is to work up the courage to plug something that I constructed into the wall to test it out! Thanks again for the easy to follow instructions!
Drizzt80
Dakota Corns
DotSpot, great information and thanks again for posting it.
Was in a lab safety meeting today for teacher inservice, and since extension cords are considered dangerous, it was recommended when you need to use one, use the 'thick orange ones' that have the grounding plugs etc. I would probably recommend for the dimmer switch/outlet box to in fact use the higher grade ext. cord to create it. I plan to just as extra precaution. I can't see a way around using the wimpier ext. cords with the flexwatt due to the ground wire . . .
A question though . . . Do you see any difficulties/problems with using a GFI outlet with the dimmer switch setup? Again, extra precaution!
D80
DdotSpot
The Snewbie
Drizzt(by the way, I love your name!),
Yes, I would much rather recommend the extension cord with the grounding wire...I think using the GFCI would be great idea. With this post I was working on the cheapest price(while still being safe). Unfortunately, getting the more expensive ext. cord and the GFCI, will boost your cost quite a bit and it won't make it much cheaper than the actual Rheostats...but hey, I like this design better anyway!
Thanks for the question,
Daniel
Drizzt80
Dakota Corns
DdotSpot said:Drizzt(by the way, I love your name!),
Yes, I would much rather recommend the extension cord with the grounding wire...I think using the GFCI would be great idea. With this post I was working on the cheapest price(while still being safe). Unfortunately, getting the more expensive ext. cord and the GFCI, will boost your cost quite a bit and it won't make it much cheaper than the actual Rheostats...but hey, I like this design better anyway!
Thanks for the question,
Daniel
I understand working it out on the cheap . . . BUT, after my sister-in-law's house burnt down this winter due to her hubby's using a heat lamp outside for his dog . . . Well, a few extra bucks now to avoid that possibility myself is well worth it in my opinion. (BTW, yes he was an idiot, and was told not to use that heat lamp outside! Either way, it's been an expensive lesson for him to learn!)
D80
DdotSpot
The Snewbie
Drizzt80 said:I understand working it out on the cheap . . . BUT, after my sister-in-law's house burnt down this winter due to her hubby's using a heat lamp outside for his dog . . . Well, a few extra bucks now to avoid that possibility myself is well worth it in my opinion. (BTW, yes he was an idiot, and was told not to use that heat lamp outside! Either way, it's been an expensive lesson for him to learn!)
D80
I agree...that is probably his most expensive mistake!
I tried it...
Well I got a new snake rack so I tried out your little method and it worked. I am not an electrician by any means, as a matter of fact know nothing about it. I made the one with the dimmer and the plug in the box. I came in about 20 dollars over the $7 but I did buy the heavy duty extension, and I bought them at Home Depot so they were a bit more expensive than Wal-Mart. I am now trying to regulate the temps.
It was actually pretty simple, I just don't like messing with electricity. I want to build a box for it to fit in. I keep the rack in my bedroom so my wife would like it a little more appealing. The least I can do, since she does not complain about them in our bedroom.
Great idea and it was a simple as yoiu stated.
Thanks
sircat
Rachel
thanks...this looks great and doesn't leave me clueless like when ppl try to explain rack wiring
I haven't seen an extention cord with grounding around here other than surge protector strip things (can you use one of those?)...but there is a hardware store nearby and I'll see if they have these things
and with the other side of extention cord it will work for more than 1 tank?
I haven't seen an extention cord with grounding around here other than surge protector strip things (can you use one of those?)...but there is a hardware store nearby and I'll see if they have these things
and with the other side of extention cord it will work for more than 1 tank?