• Hello!

    Either you have not registered on this site yet, or you are registered but have not logged in. In either case, you will not be able to use the full functionality of this site until you have registered, and then logged in after your registration has been approved.

    Registration is FREE, so please register so you can participate instead of remaining a lurker....

    Please be certain that the location field is correctly filled out when you register. All registrations that appear to be bogus will be rejected. Which means that if your location field does NOT match the actual location of your registration IP address, then your registration will be rejected.

    Sorry about the strictness of this requirement, but it is necessary to block spammers and scammers at the door as much as possible.

Socket set mania

Rich Z

Administrator
Staff member
Well, I guess I've always had sort of a tool fetish. Bonafide tool-a-holic, I suppose.

A while back I added another tool cabinet and decided to rearrange everything to try to make the tools more organized and accessible. Of course, now I can't find any of them without opening at least half of the drawers, but that's another story.

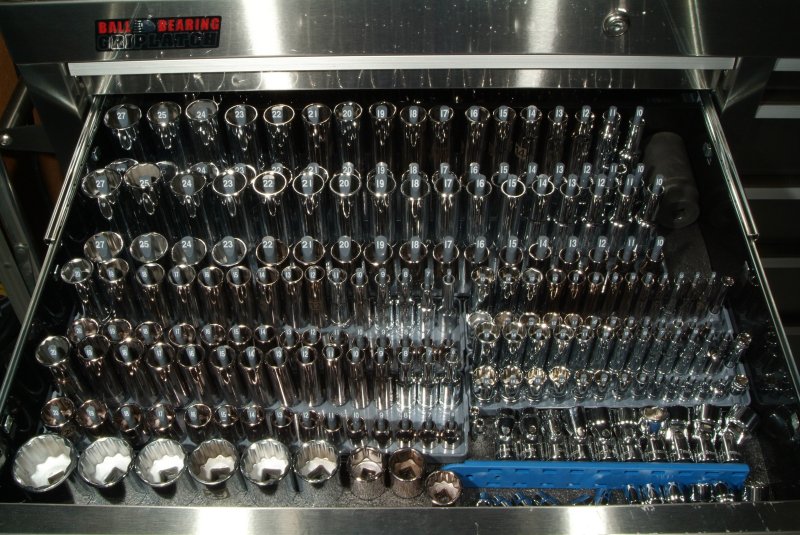
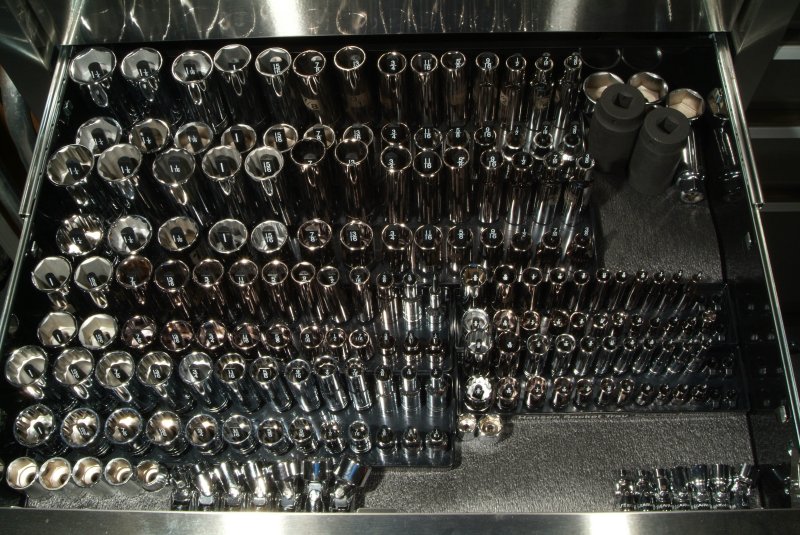
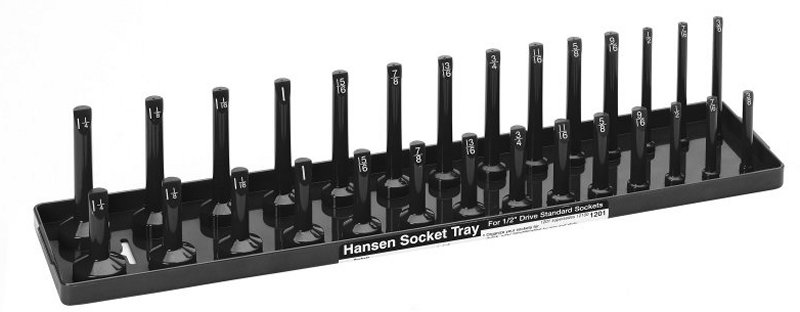
Anyway, I saw these pretty neat looking socket organizers at the local Sears store a while back, and decided to get a complete set of them for both metric and SAE sockets. Both 6 point and 12 point versions. 1/2 inch, 3/8 inch, and 1/4 inch. Standard and deep sockets. Suddenly that LOT of sockets I thought I had didn't seem like such a LOT any longer.

socket_tray_01.jpg


The bunch of sockets I had were just laying around in drawers, so I really didn't have any good idea of which ones I might or might not have. So I figured organizing them would have me a great idea. Losing a socket would be a thing of the past, because each would have a place where it HAD to go when I put them in the tool cabinets.

But I didn't realize how overpowering it would be to see the HOLES in my "collection" of sockets that I DIDN'T have and have this compelling urge to fill them. Kind of felt like an itch some place I couldn't scratch every time I would open up one of the socket drawers. I resisted for a while, thinking it was just silly, but the itch just got worse over time. My eyes were always instantly drawn to the empty pegs pointing accusingly at me that they were neglected by being empty. So is this some sort of tool OCD affliction?

OK, so I surrendered and figured I would just complete one tray at a time by ordering what I needed and fix this problem gradually. Sockets are really quite expensive when you get right down to it and *need* a bunch of them. I never would have thought I was so socket deficient. Actually I can never remember NOT coming up with a socket I needed when I needed it, so this is really pretty baffling.

Advance Auto always seems to have some sale going on with free shipping, and they tend to sell pretty good brand name tools from what I've seen. So a couple of weeks ago ordered about a dozen individual sockets from them. I completed the order online after finding the ones I needed for the first tray, and not long afterwards started getting notices of them being shipped. One at a time. One notice for each socket I ordered. I figured it must be just the way their ordering system works, and I would get a box with them all inside. But nope. UPS delivered a dozen boxes all with a single socket inside. :shrugs:

Pretty ridiculous way to do it, as I'm sure they had to lose money that way, but whatever. I figured maybe it was just a fluke.

I do have to admit that it was strangely satisfying to me when I put those new sockets on those empty pegs. And yes, I did polish them to make them shine. :eek:

So the other day I got a $50 discount coupon sent to me, and I figured I could order another batch of sockets, as the itch was building up again. Ordered 14 of them this time. Would have gotten more, but they were out of stock on some I wanted, er NEEDED. With the coupon I'm getting them at half price plus getting free shipping, so it actually is a pretty good deal.

So lo and behold UPS delivered a box today from Advance Auto, and yep, you guessed it. It had ONE socket inside. :crazy01: So I guess I've got 13 more boxes that will be showing up over the next several days. The UPS driver is probably not going to be thinking very kindly about me. I WILL not tell him what is inside of them all.

Anyway I can't see how Advance Auto can possibly be making any money like this, but heck, if you ever want to give someone a LOT of Christmas presents some year, order them a set of sockets in this manner from Advance Auto. I'm sure it will look impressive under the Christmas tree, and they will have LOTS of presents to open up Christmas morning.

In any event, I almost have the metric sockets complete, so I'll be working on the SAE sockets the next time AA has a good sale. Too bad I don't have anything worthwhile to do with all those little boxes I'm getting, though. I do hate just throwing them into the recycling bin from WastePro.
 
You can never have enough tools, and if we shipped stuff that way where I work head's would roll. And you shined them; yep, tool fetish. Not that there anything WRONG with that...

Bet the small boxes would make great baby corn hides ;)
 
Well the boxes are larger than that. That's what makes this so darn funny. They could have fit ALL of the sockets into any one of those dozen boxes they sent.

So what's the minimum that a box and packing along with UPS ground shipping is going to cost there per box? The average price I paid for each socket works out to be only about $5. Hmm, maybe AutoZone is handling their shipping for them..... :laugh:
 
If I shipped you something in a 12X9X6 box that weighed 20 lbs from work (Elkridge MD) to Tallahassee UPS Ground would be $23.51...At a 1/2 lb in a 5" square box it costs $12.67...Shoot 50lbs of sockets in an 18X18X24 would be $45.37. I would hope AA is getting SOME kind of price break, or whoever is in charge of shipping is wasting mad bucks :laugh:
 
Ahh tools... I think my husband secretly likes it when I ask him to build me something b/c he is bound to need a new something or other to do the job ;)
 
Heck, I've been lusting over a good sized metal lathe for a while now. I don't have anything in mind to DO with it, but I sure would like to HAVE it. :laugh:

I've already got a medium sized milling machine that I bought to create those deli cup water dishes I used to have. Beyond that, the only thing I've used it for was to fabricate a bracket to hold the MAP sensor into my new intake manifold.

map_bracket_02.jpg


map_bracket_03.jpg


map_bracket_04.jpg


map_bracket_05.jpg
 
Monthly I look at purchasing a desktop mill/lathe setup. I have no need for it at all but there is a strong WANT for it.
 
Well, I believe my socket set collection is now complete. At least as far as those socket holders are concerned. Some of them were a bit of trouble to locate....

sockets_01.jpg


sockets_02.jpg


Yeah, I know there are other types of sockets out there, as well as 3/4 and 1 inch drive. I can live without them, I think. I'm not planning on ever working on heavy machinery. Actually, I'm pretty amazed that there aren't metric DRIVE sockets too, to be honest about it. How did THAT one slip by the metric conversion police?
 
Rich...

As a CNC/manual mill/lathe operator....

I must say.... That's some nice work on that bracket!

What tolerances did you set for yourself? ; )

Where I work, I've held stuff to .0002 of an inch.

But most stuff is +_ .005.


Did you use an insert cutter on the larger surfaces?


1/2 inch endmill or 3/8 to do the two recessed areas? You fed down? Not in... Correct?

Chatter marks! Ugh! I hate when that happens!

1/8 chamfer on the one edge.... Very nice!

All in all..... Superb job!

( hard to judge the size of your bracket.... So my guesses on the tooling may be off).


( I think I can still get the blueprint for a working Gatlin gun.... If you need a project! Just saying.)
 
Heck, thanks! I was actually just winging it making a lot of trips between the garage and the workroom as I needed to make my cuts and check on them. I know I could have saved myself a lot of trouble by just spending the time measuring everything carefully, but I started into this not really sure what I wanted. Countersinking the bolt was even just an afterthought.

So most of your questions will only have an "I don't know" for answers, I'm sorry to say. I did that last year some time (I think) when I was working on fixing a LOT of problems two shops left for me on the car. So my mind was really overloaded to the breaking point and I was pretty stressed out. That sort of situation plays hell on the memory even without old age taking knocks at it. Now looking back at it all, I get the cold sweats just thinking about the amount of work I did just trying to get the car back on the road. Not to mention the cost involved. But it was either DO IT, or scrap the car for parts. And I'm not normally a quitter by nature.

But on the plus side, it gave me an excuse to buy a whole lot more tools than I would have figured I'd need. So there was a pretty good upside to all this. Plus I learned a hell of a lot about that car along the way.

Rich...

As a CNC/manual mill/lathe operator....

I must say.... That's some nice work on that bracket!

What tolerances did you set for yourself? ; )

None. I just needed it to fit securely. You would not believe what nearly everyone else I saw is using to hold their MAP sensor in place. Just a single bolt holding against the "ears" of the map sensor with a hope and a prayer that it doesn't come loose.

Where I work, I've held stuff to .0002 of an inch.

But most stuff is +_ .005.

Yeah, this isn't like wood working where you HAVE to leave gaps to take into account wood swelling and warping.

Did you use an insert cutter on the larger surfaces?

Don't know the actual nomenclature, but I used a BIG milling bit at slow speed. I've got a pretty good sized milling machine with motor driven table feed. I wanted to polish out the milling marks but Connie said she liked that look. All I needed was a good excuse to leave it be. :)

1/2 inch endmill or 3/8 to do the two recessed areas? You fed down? Not in... Correct?

Don't remember, but I do believe I drilled downwards. As for what size I used? Heck I just measured the "ears" they were used to clear and used whatever bit I had that would work.

Chatter marks! Ugh! I hate when that happens!

That's probably one of the toughest things to learn, because you learn as you go, and each type of metal and bit seems to be different. Spindle speed and material feed speed. Most times you want to hurry it up too much.

1/8 chamfer on the one edge.... Very nice!

Actually, I believe I just used a lowly file for the chamfering. Except in the bolt hole.

All in all..... Superb job!

( hard to judge the size of your bracket.... So my guesses on the tooling may be off).

I'm actually astonished that a real machinist would think I even did a half-assed job with this. So, thanks!

That piece is only about an inch wide and about an inch and a half long. It's from some aluminum stock I bought a long time ago just because I wanted SOMETHING to use to play around on the mill with. I actually bought the mill to make those PVC water dishes for the deli cups I was keeping baby snakes in. I think I broke even, so the mill got paid for from the sales of those water dishes.

I have to say that I really enjoy doing this kind of stuff, but unfortunately REASONS to use the machinery are few and far between. I dug out from under some plastic wrap a little Emco-Maier lathe I've had for years so I could try to cut off a banjo bolt that is too long, and failed miserably. I spend the better part of a day just figuring out how to use the darn thing and I still haven't figured out why the tooling doesn't line up like I think it should on the work piece. Boogered up the bolt before remembering that tailstock center I SHOULD have been using. Darn miracle I didn't take off a finger tip when I forgot the first rule of machinery to TURN THE BLASTED THING OFF! when the bolt slipped out of the chuck and jammed against the cutting tool. Luckily it's a belt drive instead of direct gear or things could have gotten broken and maybe blood drawn.

Even so, I still find myself lusting over a bigger lathe, even though I don't have a darn thing I can think of to DO with it. Heck, a CNC lathe would be a LOT better, too! But I'm sure something like that is WAY, WAY out of my price range.

( I think I can still get the blueprint for a working Gatlin gun.... If you need a project! Just saying.)

Maybe some day if I get some reason to want to do something like that. I'm thinking a 12 gauge Gatlin gun would be pretty darn awesome! That would put my Street Sweeper to shame, for certain.
 
Rich,

If you could see some of the work turned in by the "noobs" at our shop.... You'd understand. ;)

So.... If you ever wish to "un-retire".... I'm sure I could get ya a job! ;)

CNC lathe.... We bought one at the shop in 1998 for $96,000.00. But I'm sure they have smaller models.

I was sent to school to learn how to operate that one. Now I'm running a CNC mazak milling center. Pretty fun really.
 
So.... If you ever wish to "un-retire".... I'm sure I could get ya a job! ;)

Thanks, but no thanks. I kind of like going to bed when I want to, and getting up when I want to. And the decision of what to do today is mine (unless Connie has something she wants me to do :( ), not someone else's.

But I do have to admit that I would love to apprentice with someone to really learn how to be a machinist. But I've likely missed the boat on that one.

CNC lathe.... We bought one at the shop in 1998 for $96,000.00. But I'm sure they have smaller models.

I was sent to school to learn how to operate that one. Now I'm running a CNC mazak milling center. Pretty fun really.

Even at 10 percent of that price, it will still be way out of my league. I can't be TOO foolish on how I spend money that needs to help Connie and I live at least modestly comfortable for the rest of our lives. Heck, if these websites I am running weren't pulling in some money, the future really wouldn't look all that rosy at all.
 
Speaking of machining stuff, the other day I was racking my brains trying to find some end caps for some vacuum hoses coming off of my turbo wastegates. I didn't want to cut off the male plug ends as there is always a chance I may have to go back to that (long story...), so I just wanted to screw caps on them and tie them up and out of the way.

So after fruitless searching for 10mm x 1.0 mm threaded caps, it suddenly dawned on my that I could just make the suckers. I had some brass rods stashed in a drawer that were the right diameter, and had the little lathe and a tapping die. So why not?

They didn't turn out too bad, I guess....
vacuum_fitting_11.jpg


vacuum_fitting_15.jpg


vacuum_fitting_12.jpg


But there was a problem...

You can't tell it just looking at the photo, but those caps SHOULD have fit onto those plug fittings a LOT better than that. Should have pretty much buried the threads, but that was as far as they would go. Too much thread was showing, it seemed to me.

While I was looking on the net to see what sort of fittings they are, I found this product that looks pretty much like what I originally had screwed into those wastegates and those caps are now threaded onto.
vacuum_fitting_10.jpg


Here's the description of them:
Synapse Boost Connect Low Temp. Straight Fitting 1/8 NPT w/ 12mm Hex (3 Piece Pack)
Source: http://www.verociousmotorsports.com...t-Connect-Low-Temp-Straight-1-8-NPT-Connector

Well, that explains the problem, I think. Anyway, I decided to take those caps off to look more closely at the threads on those plugs. While doing that, on the first one the WHOLE THING came off the hose pretty easily. I tugged on the other one, and that one didn't struggle much neither before popping off the hose. Well isn't that special? I had put some teflon tape on those plug fittings back when I was checking the springs in the wastegates, and since I couldn't see the darn things when I put them back in, (the holes in the wastgates are on top) I didn't realize they weren't going all the way into the wastegate's threaded holes.

Anyway, I thought maybe the teflon tape was binding up the threads (yeah, not likely, but SOMETHING was), so I decided to take a die and use that to clean up the threads the easy way. Well, I couldn't do it with just my fingers like I thought I could to clean out the teflon tape. So I had to put a little bit of leverage behind it. And darn if it didn't seem to me that I was taking metal out of those threads! :eek: How could that be?

Well that description of the fitting explains it, I think. Those fitting ends are 1/8 NPT. The holes in the wastegates are 10mm x 1.0mm. They are VERY close, but definitely different. That's why the male fittings wouldn't go all the way into my female endcaps. Those male fittings are a tapered thread, and my female caps are a straight thread. The holes in the wastegates are also straight threads. Of course, the plugs aren't a tapered thread any longer, because my die took care of that. And now the caps fit on them perfectly.

Anyway, I'm curious now about how those two different types of fittings (1/8 NPT and 10mm x 1.0) will play together in a pinch. They are close enough where they might ALMOST work, I guess. But I certainly don't think it is correct to intermix them like was done on my wastegates. Heck, had I known this while making those endcaps, I could have just tapped them for 1/8 NPT instead of 10mm x 1.0. I have the taps for both of them.

As for those male fitting popping off of the silicon hoses, I put some plastic adhesive into the plastic fittings to try to weld the hose in place there. Hopefully that will hold them.

Oh, here's a pic of my little baby lathe:
lathe_compact5_01.jpg


I noticed that the cutting tool was moving a bit while cutting those end caps so maybe I will be able to talk myself into getting a larger one. :grin01:

Today I'm going to be pulling off the turbo compressor housings to drill and tap 1/8 NPT holes in them to run the boost pressure lines directly from the turbos to their respective wastegates. Before, the wastegates were attached to the back of the intake manifold, but after talking with Tial (the manufacturers of the wastegates, they said that they are not designed to be attached that way and will not respond well to being attached to a vacuum source. Seems like a lot of people are hooking them up wrong, apparently.

But anyway, I'll get to play with my milling machine again. I'll be doing all the drilling of the turbo housings on this thing.

milling_machine_20.jpg
 
Not bad rich! Not bad at all! 1/8 NPT. Straight or tapered? Probably a 27 thread ?

You do good work. I'm not much of a car buff... But I do enjoy your posts.

Keep us updated!

( when ya getting that CNC?? Kidding of course.)
 
1/8 NPT is a tapered thread. 10mm x 1.0 is straight.

I drilled and tapped a hole for a fitting on one of my turbo housings today.

compressor_fitting_01.jpg


compressor_fitting_02.jpg


compressor_fitting_03.jpg


Got to do the other one maybe tomorrow.

One thing about using a milling machine as a drill press, NOTHING moves. Solid as a rock. :grin01:

BTW, I casually mentioned to Connie that I was thinking about getting a bigger lathe yesterday. She didn't say anything, so I figured she wasn't keen on the idea and I didn't say anything more about it. But this morning she surprised me by telling me she was thinking about the lathe and wanted us to measure some places where it might fit. :cheers: So I guess I've got tentative approval from the boss.

Of course, I haven't told her how much it's all going to cost with the stand and tooling. Heck, I don't know which one I will get anyway. I don't really want a monster one that will weigh too much. I don't see ever having to do anything a 9 x 20 can't handle. I was kind of keen on the South Bend 8K lathe, but I understand that even those are made in China these days. I like the idea of a continuous variable spindle speed. I'm not sure if the SB has power cross feed or not. But the tooling for the SB is expensive compared to something like a Grizzly. Of course, I understand that Grizzly now owns South Bend anyway.

I could get a lot more lathe for my money with a Grizzly though, and I guess since they are all made in China, the only thing you have to compare with is price on these things.

I guess I'm afraid of piling so much stuff into the garage that I won't have room for the vehicles any longer. That seems to happen to an enormous number of people around here. You see their cars all parked out in from of the closed garage door because the garage became one big storage area.

I certainly can't let that happen or we'll be back to having problems with the rodents chewing up wires under the cars again.
 
Got some new clamps in from Summit Racing today, so I was able to put everything back together again. Had the tightening nut bind up and snap the bolt (these are T-bolt clamps I am using) yesterday, so I had to replace it.

turbo_compressor_fitting_01.jpg


turbo_compressor_fitting_02.jpg


turbo_compressor_fitting_03.jpg


I took more care tapping the hole for the driver side compressor housing and actually stopped when I had about a quarter turn more to go to thread in the fitting by hand, figuring tightening it with a wrench would snug it up right where I wanted it. I guess the sealant I am using also acts as a pretty good lubricant, because I felt like I could have gone another quarter turn to tighten it real tight. But I left it where it was on my mark. It should be OK. If those NPT fittings loosen up or give me any problems, I guess I can always run a 10mm x 1.0mm tap through the hole and just put banjo fittings in there. Maybe I should have done that from the start. Oh well.

But had another mishap today. Right off the bat I started tightening one of the clamps holding the coupler to the inlet of the compressor housing and the darn clamp was moving all around. So I used my left hand to hold the clamp still while I tightened with my right hand with the socket wrench. The socket was on a longer extension so I could tighten without worrying about my knuckles banging against anything. Not sure what happened, but the socket slipped off of the nut to tighten the clamp and somehow the socket end fell backwards and smacked me right on the right eyebrow. I tried to show Connie how it happened later, and darn if I can figure it out. It appears that the socket had to have fallen upwards and then over, defying gravity, to hit me. Anyway, I thought it was just a bang on the noggin, but my fingers came away bloody when I touched the impact spot on my brow. And how in the world that rounded edge of the socket could bite me like that is a mystery as well. It couldn't have been moving with that much speed to have any force behind it. But in any event, bite me it did, and I guess I'll have a little scar there from it.

I guess I'm just lucky it didn't hit an inch lower and catch me in the eye. That could have turned out pretty ugly since it broke the skin on my eyebrow. Of course I didn't have any safety glasses on, as I wasn't expecting anything to be flying around that could get into my eyes.

Not too sure I'm so thrilled now about the socket collection I have if they are going to be turning mean on me.

Anyway, I guess I can take the car out in the next couple of days and see if I forgot to tighten anything and something falls off. Then get back to trying to finish up the tuning. Hopefully the turbo boost stuff will work OK, and I'll be getting a bit more than the 8 lbs or so that I was getting before doing all this. And hopefully that plastic airbridge won't blow with any increased pressure inside it. I still don't really trust it much.
 
BTW, I casually mentioned to Connie that I was thinking about getting a bigger lathe yesterday. She didn't say anything, so I figured she wasn't keen on the idea and I didn't say anything more about it. But this morning she surprised me by telling me she was thinking about the lathe and wanted us to measure some places where it might fit. :cheers: So I guess I've got tentative approval from the boss.

Of course, I haven't told her how much it's all going to cost with the stand and tooling. Heck, I don't know which one I will get anyway. I don't really want a monster one that will weigh too much. I don't see ever having to do anything a 9 x 20 can't handle. I was kind of keen on the South Bend 8K lathe, but I understand that even those are made in China these days. I like the idea of a continuous variable spindle speed. I'm not sure if the SB has power cross feed or not. But the tooling for the SB is expensive compared to something like a Grizzly. Of course, I understand that Grizzly now owns South Bend anyway.

I could get a lot more lathe for my money with a Grizzly though, and I guess since they are all made in China, the only thing you have to compare with is price on these things.

Well, I finally found a lathe that I want. Quite a bit bigger than my current baby lathe, but not a huge one. Weighs in at somewhere between 460 and 650 lbs, depending on where you look for that sort of info.

PM-1127VF_01.jpg


It's the smallest lathe I could find with all the options I wanted and the ability to handle anything I think I might want to work on with a lathe in the foreseeable future.

Just picked up a 2 ton shop crane from Harbor Freight today that I need to put together, but there is really no rush as there is likely going to be a 10 to 12 week delay before it is actually shipped. I believe this is a very popular little machine from the reviews I've found.

 
Back
Top