• Hello!

    Either you have not registered on this site yet, or you are registered but have not logged in. In either case, you will not be able to use the full functionality of this site until you have registered, and then logged in after your registration has been approved.

    Registration is FREE, so please register so you can participate instead of remaining a lurker....

    Please be certain that the location field is correctly filled out when you register. All registrations that appear to be bogus will be rejected. Which means that if your location field does NOT match the actual location of your registration IP address, then your registration will be rejected.

    Sorry about the strictness of this requirement, but it is necessary to block spammers and scammers at the door as much as possible.

Building your own rack system

CAV

Dazed and Cornfused
After several emails requesting information on my rack, uh rack system ;) , I decided that the easiest thing would be to start a new thread. I'll try to be concise.

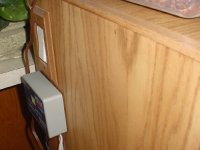
I build my racks out of wood. They are much heavier that plastic racks, but are much more durable. You can pick any type of wood and stain that will match existing furniture. The one pictured here is made of oak and stained in a cherry color. Everything you need may be purchased at your local home improvement center.

A basic rack can be build with the following materials:
1) 2 sheets (4'x8') of 1/2" or 3/4" plywood
2) 1"x2" solid oak trim, enough to wrap the front
3) 1 sheet (4'x4') of 1/4" pegboard for backing
4) 20' of 4" Flexwatt heat tape
5) stain and sealer of your choice

Total cost: Under $200

You will also need to purchase a thermostat for proper heat, if you don't already have one.
 

Attachments

  • rack3.jpg
    rack3.jpg
    60.7 KB · Views: 4,511
24 sweater boxes or 12 blanket boxes

This design allows the tubs to grow with your snakes. If you use Rubbermaid it is #2220 and #2221 and Sterilite it is 12 qt and 28 qt. With both makers the tubs are the same height, and the larger tubs are twice the length. This means that 2 smaller tubs setting side-by-side occupies the same space one large one.

The directions for making arack system are basically identical for every possible design. In order to preserve my sanity and not bore everyone with exquisite details, direction may be found on several webpages, as are the wiring instructions for the Flexwatt tape.

Basically, you can build a system that is as big or as small as you want to make it. Each is fully customizable. The unit here is 40"H x 50"L x 20"D. I added rope lighting wired to a switch as a finishing touch. (This is not required and is just a personal preference.)

Here is a closer view of one of the shelves. (If you look closely you can see one of my favorite Butter Motleys :D )
 

Attachments

  • rack5.jpg
    rack5.jpg
    52.7 KB · Views: 4,334
Thermostat and light switch

I use a helix unit on each rack.
 

Attachments

  • rack4.jpg
    rack4.jpg
    36.6 KB · Views: 4,221
For the "less than Handyman/Handylady"

If you aren't a "do-it-yourselfer" or are on a shoestring herp budget, here is another model that is simple and cheap. Entire cost: $85 with heat tape.

I am in the process of building another furniture grade set-up but needed additional space pronto. (Picked up 4 more snakes this weekend and have two more on the way from Bill @ Blue Ribbon) I built this quickie rack in under 2 hours on Sunday.

In this pic you can see the two tub sizes side-by-side.
 

Attachments

  • rack1.jpg
    rack1.jpg
    48 KB · Views: 4,206
Last edited:
That's all there is to it!

If anyone has a question or needs more info, drop me an email.

Live in or around Texas and are interested in a system? Give me a shout. I'll be happy to work up something for you.

Rich, if these pics are too big let me know and I'll fix. Here is one last view:
 

Attachments

  • rack2.jpg
    rack2.jpg
    41.2 KB · Views: 4,082
Khaman,

Thanks for the link. I was going to paste it in, but realized it was saved on another computer. How did your project turn out?
 
Real clean "furniture grade" set-up...Very Nice...

For the "less than Handyman/Handylady"
That rack is a very practical,simple and inexpensive, minimal tools required design, just about anybody could build that. It just doesn't get any easier. :)

A few hopefully relative links...
http://www.arbreptiles.com/cages/flexwire.html
http://www.kingsnake.com/obsoleta/flexwatt.htm

Proportional thermostats like the helix are great, but are somewhat expensive. Probably worth every penny one pays in the long run.
A proportional thermostat is much like a rheostat with a feedback system.
The thermostat continuously monitors the temperature and makes slight adjustments in the electrical current to the heater.
In this type, the heat is always on, but only at the level necessary to maintain the set temperature.
Proportional thermostats eliminate the fluctuations caused by the on/off cycle of conventional-type
( Non-proportinal ) thermostats and provide a continuous warmth from the heat source.
http://helixcontrols.com/default.htm


Rubbermaid Clear Storage Box..
"Clear with white lids."
No. 2220: 3 gallon, 16" x 11" x 6"
No. 2221: 7 gallon, 23.01" x 16.75" x 6"
 
Last edited:
Still going I soon realized that I could not do it myself so I enlisted my wife's help. Well we finished with the wood we had and I still have room to add two more shelves so it is back to Home Depot this weekend and maybe Target will have more containers, I bought them out on the 27qt sterilities #1956.

Anybody know of an online source for commonly used container sizes?
 
I know the feeling. I wiped out three Wal-Marts in two cities. My favorite quote was "You sure do have a bunch of sweaters for Texas."

Have you started putting vent holes in the sides yet? THAT IS NOT A FUN TASK!:mad:
 
No, but I never sweated that part I just use a soldering gun.
I did 81 6qt rubbermaids in 20 min with six holes in each...true the garage smelled funny for a week but oh well.
 
Sealer (types?) recommendations?

5) stain and sealer of your choice


Of all the "water seals, what are the pro's and cons of the most popular ones?
Such as:
"Thompsons" (Brand) water seal?
polyurethane?
epoxie's?
others?
In ones opinion what is the best?
What sealer is the easiest to work with?
Any toxic residue sealers out there, to be avoided?

With any water seal treatment, I would think that a complete "curing/ drying" would be of key importance, before introducing ones Corns. imho.

Is it best to attach the Flexwatt to the pegboard back?
http://www.cornsnakes.cm/forums/showthread.php?s=&threadid=4892&highlight=racks+flexwatt7g
 
Last edited:
CowBoyWay,

I tried to address each of those questions. Here are my personal choices:

I used a combo stain/sealer. I prefer these stains because they give a even color, without over-penetrating. They are more or less water resistant, don't give off fumes (once dry), and leave a smoother finish. On the shelves that is all I used.

For the exterior, I used a water based semi-gloss urethane spray. The water base dries faster, cleans up quicker, and lasts longer than regular poly. After the stain dries for 24 hours, I apply the finish. All that is required is one hour between finish coats. (After each coat, I lightly sand with 0000 steel wool.)

I moved the rack inside that night with no detectable smell. I then waited for about 3-4 days before placing the tubs and snakes inside.
 
Last edited:
Hey Cav, just to compare...how many ventilation holes are you putting in your containers? I have a similar rack system and have been putting two rows of holes on all four sides of each of the sterilite containers. They seem to work fine, but I was just curious how you did yours. Thanks for any input.:)
 
This is one of those "it depends" answers

I have experimented with this. The ambient temperature in your home will determine the necessary ventilation requirements. I tried front and back only, sides only, and all four sides. The results varied substantially.

Here is what worked best for me:

I drill 1/8" holes at 1" intervals around the perimeter. In the middle third of each side, I added a second row offset over the first row. You can see this in the close-up picture posted earlier in this thread. To date, all sheds have been complete, so I am happy with the results. I decided on this design based on the condensation levels inside. I use fresh Repti-Bark, which as a high moisture content initially. It dries out after being exposed to the heat source for 3-4 days. Once the humidity drops I check the level using a hydrometer. If you live in a drier climate, less holes will be needed to maintain proper moisture levels.
 
Last edited:
Another tip for making ventilation holes

For those of you that are having to make holes in LOTS of sweater/shoe boxes, multiple soldering irons work great. I purchased three inexpensive soldering irons at a local hardware store (for around $5-7 each, can't remember exactly) and then fabricated a wooden mount to hold all three of them together. It works like a charm.

I realize some people prefer to drill, but soldering irons do work well if you have an area with really good ventilation. I don't recommend using a soldering iron to melt holes indoors as the fumes are highly noxious. :(
 
I attempted this, but wasn't happy with the quality control. Some of the holes were bigger than I felt confortable with. The smaller holes help me retain more moisture in the tubs.

I'm interested in what ventilation methods others use in their rack systems.
 
Last edited:
the tubs

hey there.

i was just wondering what size containers (measurements) are u guys using for your adult and yearling corns.And how do u guys install the heat tape is it under the containers or wat.

thanks
 
I am using 27 quart {22 1/4" x 16" x 6" (LxWxH)}sterilities in mine. as for the heat tape it is attached to the back of the rack using aluminum foil tape.
 
Back
Top