• Hello!

    Either you have not registered on this site yet, or you are registered but have not logged in. In either case, you will not be able to use the full functionality of this site until you have registered, and then logged in after your registration has been approved.

    Registration is FREE, so please register so you can participate instead of remaining a lurker....

    Please be certain that the location field is correctly filled out when you register. All registrations that appear to be bogus will be rejected. Which means that if your location field does NOT match the actual location of your registration IP address, then your registration will be rejected.

    Sorry about the strictness of this requirement, but it is necessary to block spammers and scammers at the door as much as possible.

Substrateless incubation methods

desertanimal

2003 UB313
Please contribute photos and explanations of your substrateless incubation methods! I remember several years ago when I was trying to figure out how I wanted to proceed, there were lots of different methods spread out all over the place. All of them had merit, but it took a lot of searching to find them!

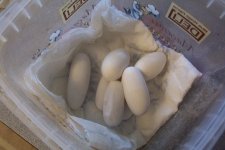
For the small numbers of clutches I tend to have, substrateless methods have worked really well for me. I like that I can see all of all of the eggs, and I like that I don't worry about keeping the eggs too wet and that I can easily make them moister if they're denting (too early) by draping them with a damp paper towel.

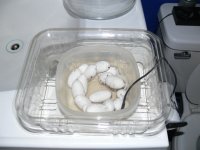
This is the technique I'm using this year. The outer, sealed container has some water in the bottom to provide humidity, the inner container is open. When they start to pip, I'll pour out the water from the external container to make sure no one drowns. I used this set-up this year because I am hoping to get better photos of pippies than I have in the past.
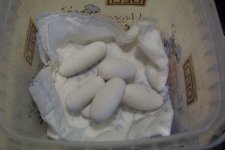
 

Attachments

  • P1200333s.jpg
    P1200333s.jpg
    129 KB · Views: 272
Previously, I have used stones and glass beads in the bottom of a gladware container, added a little water to the container but not enough to reach the top of the stones, and have placed the eggs atop the stones. So they're basically elevated over a "bed" a water. These containers were also sealed, but there is no container within a container. Sorry I don't have pics of the full containers.

Anyone else like to share?
 

Attachments

  • DSC04490s.jpg
    DSC04490s.jpg
    86 KB · Views: 267
  • pip1 Oct2007s.jpg
    pip1 Oct2007s.jpg
    136.1 KB · Views: 267
I think Wade is suspending his clutches over egg-crate grid this year.
I like the idea of the glass beads you used before, I'll give that a go next season.
 
This is an interesting tread. I use perlite as a substrate, but instead of putting my eggs in/under the perlite, I just place them on top of it. When I see my eggs are denting, I also just put a damp paper towel on top. I use a lid, but I notice that the perlite still dries out quickly, that's why I use the paper towel.

Greets Tania
 
I had read about the egg crate method, and it still appeals to me, but I decided against it when I went to buy some and it was 12 bucks a square and much more than I needed.

The method I'm using this year is my favorite so far because it requires no "stuff" at all (nothing to buy AND nothing I need to store for next year's use). The outer container is what I bought arugula in recently, and the inner one is just a food storage container from the kitchen. But this wouldn't work exactly as-is for 10 clutches as it would take too much room.
 
I'd imagine your 'bain-marie' style will also mean really even temperatures by surrounding the inner container with a water bath. I'd be tempted to use lids in case of escapees though
 
I love that name for it!

It definitely should help with temperature stability, which can sometimes be an issue here when the house heats up later in the day. If I had more than one clutch in the same bain-marie, I'd use lids to prevent clutch mix-ups and have holes punched in the inner containers while still keeping the outer container sealed. But in this case since the outer container is sealed, no one is going anywhere and there's no chance of mix-ups.
 
I dont use a substrate either. I like your stone/bead idea though! I found this fine mesh/material that is used for gutters that I sit the eggs on and have standing water underneath it. I plan on removing the water before pipping, but so far so good! I keep a piece of paper towel on the eggs for a little extra moisture, and its working out well! Then again, I am only on day 12 :)
 
Thats one thing I need to do. I will try and remember to take some tonight and post them here tomorrow. I only get internet at work, sadly.
 
Great thread idea.....

These days with the economy the way it is this may help. It's cheap....
I've always used paper towels and plastic dishes. Butter dishes usually. I dampen two paper towels, place them on the bottom of the dish. Then the eggs. Then one paper towel lightly sprayed with a water bottle. Seal it. Check at least every three days misting when needed. Sometimes I needed to change the towels once or twice during the incubation period.
I knew a guy who had an old refrigerator who place styrofoam on the shelves, mist it, then just place the eggs on the foam. He rigged up a bulb inside near the top. He raised turtles only. I never tried this method myself; don't know if it would work for snakes.

In these pics I used a potato salad container from the deli at Winn Dixie.....
 

Attachments

  • eggs.jpg
    eggs.jpg
    108.2 KB · Views: 172
  • eggs 2.jpg
    eggs 2.jpg
    104.5 KB · Views: 170
  • eggs 3.jpg
    eggs 3.jpg
    88.6 KB · Views: 171
  • eggs 4.jpg
    eggs 4.jpg
    94.5 KB · Views: 171
  • eggs 5.jpg
    eggs 5.jpg
    100.3 KB · Views: 171
I use the damp paper towel method myself for many of my rhac eggs and it works great. I use a sealed Tupperware dish, one moistened paper towel and check weekly misting when needed. This year I am using super hatch since I found a 2lb. bag I lost in my closet,lol but it's a lot like the rock method except their clay pebbles you get moist beforehand:)
 
Only method we have ever used - allows 100% humidity with no moisture directly on the eggs so no worries. We use egg crate over anything - it is perlite in this pic but has been moss, vermiculite and nothing in the past. I like moss the best - gives the babies a nice place to hide when they hatch, but no worries about it being too wet for the eggs. We have holes in the tubs and they are in an incubator with water heated by a submersible aquarium heater - has given great results over many years.

06Jun30Incubator6.jpg
 
Thanks for contributing! If I ever live somewhere that room temperature is too cool for eggs, I'm going to use the submersible aquarium heater trick, as it seems the cheapest possible way to go.
 
Sorry it took me so long, but here is how I am incubating the eggs this year.

So far, so good! I got the mesh material at Home Depot (it was meant for gutters) and it was only around $3 for 3ft or so of it. I just cut it to fit and set the eggs on it. I also set moist paper towel around the eggs.

DSC_7571r.jpg


DSC_7573r.jpg


DSC_7574r.jpg
 
Oh cool! Thanks, Angela! I like how you can take those apart and they'll take basically no room to store for next year. It looks plastic, is that right?
 
Yeah, its just plastic. It actually comes with a fine plastic mesh affixed to the otherside of it but I took it off because it was so fine that it would not let the humidity come through it and the eggs were drying out.
 
Back
Top