• Hello!

    Either you have not registered on this site yet, or you are registered but have not logged in. In either case, you will not be able to use the full functionality of this site until you have registered, and then logged in after your registration has been approved.

    Registration is FREE, so please register so you can participate instead of remaining a lurker....

    Please be certain that the location field is correctly filled out when you register. All registrations that appear to be bogus will be rejected. Which means that if your location field does NOT match the actual location of your registration IP address, then your registration will be rejected.

    Sorry about the strictness of this requirement, but it is necessary to block spammers and scammers at the door as much as possible.

Ikea Cabinet Project!

plasticknives

the bee's knees: all six
I'm building my own corn snake enclosure my modifying an old Ikea cabinet,
and I was hoping People could give me a heads up on a couple of things:
Keep in mind I'm not going to get my snake until september, so there should be loads of time for the enclosure to dry/air out.


If I use wood glue to make sure things are secure, will it be safe once it's dry/i've painted over it?
the brand is Elmers Pro Bond Wood Glue (interior)

Second, is window sealant/ silicone safe to use as a seal for the joints?
Can I paint over it or will the paint just flake off?

Lastly: what kind of paint would you recommend to coat everything in? I'm looking for something waterproof that I'd be able to wipe down thoroughly every so often.

I'm more into the designing of the cage and I'm not much of a carpenter (thus the use of old Ikea furniture) so any tips on making this easier would be GREATLY appreciated!

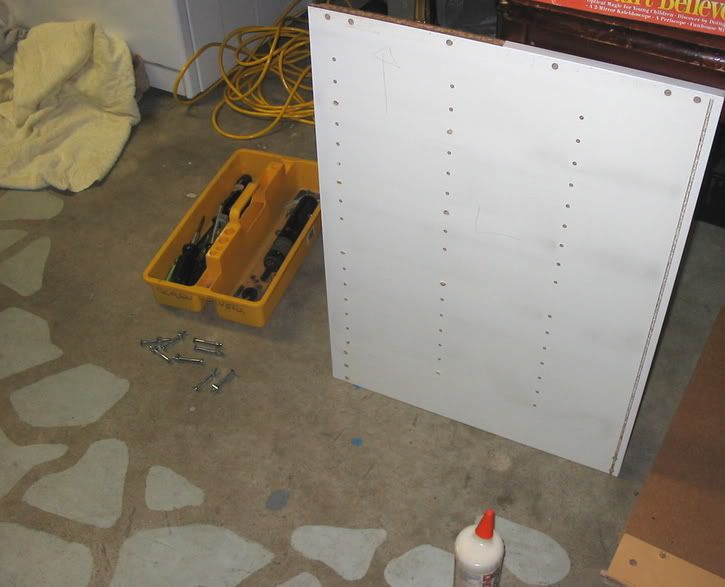
This is one side of the cabinet after I took it apart
IMG_4838.jpg
 
Wood Glue - Yes it is safe to use, once dried and allowed to air out.

Window Sealant - No, If you need to use a silicone product use fish tank sealant. Let it cure and gas out before putting in your snake.

With the sealant - it will degrade over time as it is heated and cooled within a viv, with temp changes so a lot of folks just won't use it. It is person specific, so can't help ya there, lol, sorry.

It looks like that Ikea cabinet is made of melamine which is just pressboard with a melamine outer shell. Problem with it is, you can't sand it and make it take paint. If you paint directly over the melamine it will just scrape off. If you don't make sure the edges are all sealed, water will wick under the melamine and warp the pressboard underneath and separate the melamine from the pressboard over time.

I work with melamine a lot and unless you are going to use it raw, it just isn't worth working with. There really is no good way to make it keep the paint.

Here is a link for plans if you want to build one from scratch http://www.finegtps.com/Racks.htm
if you want to use what you have, just make sure you seal every seam and use peg board for your back or sides for ventilation. If you drill holes in the melamine for ventilation you run into that problem of moisture getting under it, since the viv has to be cleaned regularly.

Good luck
 
well.. there are holes in the melanine already from where the drawers used to be...

am I royally screwed? or is the project salvagable somehow?

I've heard good things about polyurethane, but I don't know much about it so anything anyone knows would be helpful..

Also in my accidental second post, someone said something about contact paper. What are your thoughts on this- where can I find it, and is it expensive?
 
Personally I would say scrap it. You will most likely spend more on fixing that up just to start your project than you would purchasing all new stuff to build your viv with.

Go to this thread: http://www.cornsnakes.com/forums/showthread.php?t=34209&page=1&pp=10
Forum member PJCReptiles ( Jay & PJ ) just made a rack system and talk about how they did it with precut melamine shelves. You could do the same thing, just on a one level scale, to make your viv.

I can't tell you about the polyurethane as I have never used it and just personally, I wouldn't on an enclosure but maybe someone else can sound off on this area with a bit more clarity on it than I can.

I can't see how you could fill all those holes and end up with a clean look now. If you don't care about the aesthetics you could fill all the holes with wood putty and once dry sand them down to meet the surface of the Melamine, I guess, but you still would have to seal the board since now it has spots for moisture to get under the Melamine. Like I said you probably will spend a lot more money trying to fix what you have in order to use it.

Here is another pre-made inexpensive option from a previous post, don't know if you could use it or not, just posting it for a suggestion. :shrugs:

MomFor2Gifts said:
They sell these things called storage cubes, which go under a few different names but they are the stacking cubes or organizers they use to make those fancy closet with all that shelving stuff.

Here is an example of one with 2 shelves, the shelves are removable so no need to use them or you could use them as door fronts. Just cut out the center of the door front and install recessed glass.

310000.gif


Here is another example of one with a door already installed that you can also omit the shelves from and simply cut out the center and route the edges for a recess to install glass in.

310200.gif


These are melamine products so you would have to seal all the corners and crevices with aquarium sealer. If you don't any moisture that wicks into the outer edge or gets under the melamine will warp the wood underneath since it is pressboard.

These things come in all sorts of sizes so you can find one the size to fit your needs. Wal-mart, Target, Home Depot, Lowe's and other stores carry them in the home organization department and they retail about $19.00 and up.

Just an idea, hope it helps.
 
I've been looking up adhesive vinyl, and that looks to be a good option that might save the project-

it sticks onto glass, so i would assume sticking to melanine would be no problem,
it's waterproof,
and if i get some aquarium silicone, then i can seal the joints so that water can't get underneath it.
for vents , I'm going to just cut smallish square holes in the side (i can fold the vinyl over the edges there)
and use double layer window screens...

and for the 2 floor panels i might use either scrap plexiglass or big leftover tiles from out bathroom. Theres wood ones that fit in already, but i wondered about the tank heater.... maybe I'll cut a tile sized hole into it and put one tile there for the UTH to stick to underneath.

sound plausible?
 
The vinyl sounds plausible and I have a easy solution for your heat mat but I will fill ya in when I get back, I am in a crunch for time to get to an appointment and don't have long enough to type it up. I will be back in about 2.5 to 3 hours and then will explain that.
 
there were originally two compartments in the cabinet,
and rather than take out the middle piece of wood completely, i've just cut a hole in it so that now its just a frame-
keeping most of the support but also giving the snake enough floorspace. (the raised bit on the bottom is about and inch or so, so i'm planning to fill up one side with aspen on one side and repticarpet on the other.
It's also fairly high up so i thinking of putting a shelf in there, but right now i'm sticking tot he basics, and will just put some climbing branches in to make use of the height.

the two floor panels are really simple, they just drop into place and are about 4-5 inches off the ground. I've already cut a hole a little bit larger than the uth i have in one of the floor panels , and and am putting in a tile a little bit larger than that to cover the hole.

i was thinking either to rig up a little raised platform with leftover glass, some little squares of wood and some hot glue so that the uth is sticking to the glass and is right under the tile with space underneath for the heat to escape,
or to just stick the uth right to the tile after it's in place.

anyways, thats where i am RIGHT now, so if you have any ideas or modifications i need to make i'd love to hear them!

I was worried about having to scrap the project, but it's looking really promising right now!

i'm excited!
 
Sorry, was away a bit longer than I had planned, anyway Yes, the adhesive backed vinyl sounds as though it may work but then again, I have not tried it. But sounds plausible, I mean on the plan site, I listed prior, in this thread they use contact paper, which is an adhesive backed vinyl.

As far as the heat mat goes I would just cut 8 strips of wood. ( SEE PICTURE A ) Take 2 pieces of the wood and attach one above the other close to the bottom of the tank. Measure down from the bottom of the top strip, measure 1/8TH thickness more than your piece of Plexiglas or glass, whichever you decide to do. Do not make it any larger or you risk your snake getting through, but you want enough play to slip it in easily. Repeat the same process on the opposite side, to make your first glass guide. Then slip in your Plexiglas ( SEE PICTURE B)

Measure down enough space that your heat mat will fit between the next track and the first. Install the next set of tracks, the same as you did the first, one set on each side. Insert a piece of Plexiglas, ( SEE PICTURE B). You now have two tracks with Plexiglas or glass, looking like shelves. In between them slip in your heat mat, so it rests on the bottom shelf between the two. You may want to use tile on a piece of board for the bottom slide in shelf, just leave the sides bare so they can slip into the track easy. This way you have the heating part of the mat on tile instead of wood or glass if you want to save on the cost of plexi.

I hope I explained this well lol, I am not always great with instructions - Hopefully the picture will help, just don’t laugh at my drawing lol.

attachment.php


attachment.php
 

Attachments

  • Heat Mat Tracks A.bmp
    68.5 KB · Views: 37
  • Heat Mat Tracks B.bmp
    133.9 KB · Views: 38
Back
Top