-
Hello!
Either you have not registered on this site yet, or you are registered but have not logged in. In either case, you will not be able to use the full functionality of this site until you have registered, and then logged in after your registration has been approved.
Registration is FREE, so please register so you can participate instead of remaining a lurker....
Please be certain that the location field is correctly filled out when you register. All registrations that appear to be bogus will be rejected. Which means that if your location field does NOT match the actual location of your registration IP address, then your registration will be rejected.
Sorry about the strictness of this requirement, but it is necessary to block spammers and scammers at the door as much as possible.
You are using an out of date browser. It may not display this or other websites correctly.
You should upgrade or use an alternative browser.
You should upgrade or use an alternative browser.
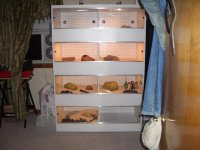
We finished our DIY project!!
- Thread starter amc0405
- Start date
Blue Apple Herps
aka Matthew, PhD
Looks great! I love a good DIY project.
desertanimal
2003 UB313
That looks very nice!
soccer191
New member
Looks very well built, and I actually plan on making something quite similar to that in the future. (Whenever I get enough snakes to be worth it) I can't tell from the picture, but is that shredded or chipped/shaved aspen bedding? I get shaved aspen in large bags, but if that's shredded, I would love to know where you can get it in such a large amount!
amc0405
New member
Looks very well built, and I actually plan on making something quite similar to that in the future. (Whenever I get enough snakes to be worth it) I can't tell from the picture, but is that shredded or chipped/shaved aspen bedding? I get shaved aspen in large bags, but if that's shredded, I would love to know where you can get it in such a large amount!
I believe it is shredded. We bought it at the show in Hamburg, Pa 2 bags for $25. The bags are 4.38 cu ft/15.9 kg compressed. This is written on the bag: Harlan Tekiad Labratory Grade Aspen Bedding. We have half a bag left and we hope to get more at the Hamburg show on Aug 7th. We like it because it is so fine.
amc0405
New member
Here are some more pictures before we completed the project.
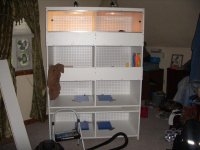
We used 3/4" white melamine board for the frame and white peg board for the back for air holes.
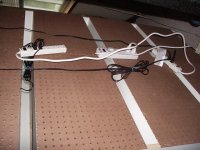
Picture 1: This is the back of the cabinet. You can see the timer for the lighting and heating pads there in the middle. One strip is for the lights and one strip is for the heat. We left a gap about 2 1/2 between each section (we wanted to leave a 4 inch gap but did not take into account the 3/4 thickness of the boards) It ended up working out for us though it was a little tight getting your arms in to place the heating pads.
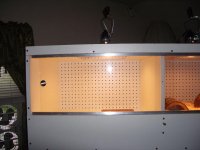
Picture 2: In this picture you can see the lighting. We cut out about a 10 x 10square and placed a piece of thicker acrylic glass because it has a higher strength and heat tolerance than plexi glass. For the heating pads, which you can see at the bottom (with the blue covering still on), we cut out a 10 x 15 square for the 10-20 gal Uth. But of course that size would depend on your UTH size. Both were routed so the glass would lay flush with the board.
Picture 3: Just an up close picture of the track we used for the sliding plexi glass doors. The track is aluminum u-channel that we bought at Lowes in 6 ft pieces. Both pieces of plexi glass fit inside the one channel which made it fit pretty tight with not much play. We bought some inexpensive door knobs for easy open/close.
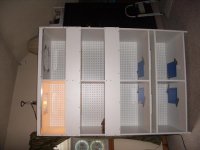
Picture4: This is just another picture before we finished. You can see the gap on the bottom half where the lighting and heat goes. This is before we put up the board on. We made it big enough to cover the gap and still have about 3-4 inches so you could put in your bedding and it wouldnt fall out and get into the tracks as bad.
We used 3/4" white melamine board for the frame and white peg board for the back for air holes.
Picture 1: This is the back of the cabinet. You can see the timer for the lighting and heating pads there in the middle. One strip is for the lights and one strip is for the heat. We left a gap about 2 1/2 between each section (we wanted to leave a 4 inch gap but did not take into account the 3/4 thickness of the boards) It ended up working out for us though it was a little tight getting your arms in to place the heating pads.
Picture 2: In this picture you can see the lighting. We cut out about a 10 x 10square and placed a piece of thicker acrylic glass because it has a higher strength and heat tolerance than plexi glass. For the heating pads, which you can see at the bottom (with the blue covering still on), we cut out a 10 x 15 square for the 10-20 gal Uth. But of course that size would depend on your UTH size. Both were routed so the glass would lay flush with the board.
Picture 3: Just an up close picture of the track we used for the sliding plexi glass doors. The track is aluminum u-channel that we bought at Lowes in 6 ft pieces. Both pieces of plexi glass fit inside the one channel which made it fit pretty tight with not much play. We bought some inexpensive door knobs for easy open/close.
Picture4: This is just another picture before we finished. You can see the gap on the bottom half where the lighting and heat goes. This is before we put up the board on. We made it big enough to cover the gap and still have about 3-4 inches so you could put in your bedding and it wouldnt fall out and get into the tracks as bad.
amc0405
New member
Just so ya know, it's not a true DIY thread until you share the fine details on it. Example..how you design your sliding doors, how did you do you heating and step by step pictures.
Oh yeah, it's very nice. I'm just jealous
Ok Lennycorn...here are your pictures and a brief explanation of how we did it. It was a pain in the a** to build though! lmao We made a couple mistakes but it all worked out in the end and the snakes are happy! If you have any questions we can try to answer them for you.
Bill and Audrey
")