• Hello!

    Either you have not registered on this site yet, or you are registered but have not logged in. In either case, you will not be able to use the full functionality of this site until you have registered, and then logged in after your registration has been approved.

    Registration is FREE, so please register so you can participate instead of remaining a lurker....

    Please be certain that the location field is correctly filled out when you register. All registrations that appear to be bogus will be rejected. Which means that if your location field does NOT match the actual location of your registration IP address, then your registration will be rejected.

    Sorry about the strictness of this requirement, but it is necessary to block spammers and scammers at the door as much as possible.

DIY new viv finally completed

LawDog1

New member
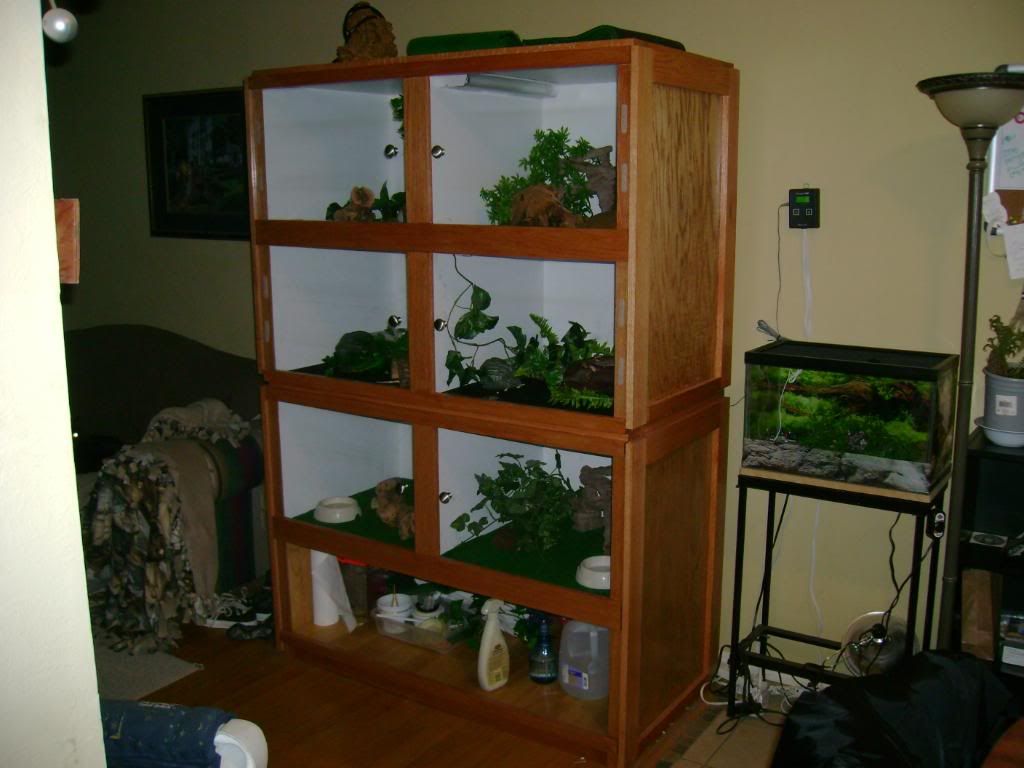
The new viv is finally completed! Well, almost. I still have to build doors and install them on the bottom to cover our junk storage shelf. I said a while back that if it came out the way I wanted it to then I should have something to be proud of. I think it came out pretty good. The idea for the way the doors lock was the result of my wife (Kitten1506) and I brainstorming and adding to each others good ideas. So far it seems to work well and we havent had an escape yet (knock knock on wood), but it was tougher to build than we thought it would be. Kitten deserves at least as much credit as I do for so much hard work. She helped with all of it, but she did about all of the sanding, and there was a lot!!

Unfortunately, a few things did not go as planned. I wont even go into the staining misshap (I will NEVER use Polyshades again!!). I planned to keep receipts for everything and report exactly what it cost to build, but since it took so darn long and I had to go back and forth to return things I lost track! My guess is that it cost in the neighborhood of $700.00. The other apology is for not taking more "in work" photos. I wanted to document the build from start to finish but obviously it didn't happen that way. If someone is really interested, send me a pm or someway let me know and I'd be more than happy to answer any questions.

Hope you like it,
Jimmy


<a href="http://s247.photobucket.com/albums/gg151/misskitten1506/?action=view&current=May2009009.jpg" target="_blank"><img src="http://i247.photobucket.com/albums/gg151/misskitten1506/May2009009.jpg" border="0" alt="viv under construction"></a>
 
oops, second try photos

construction phase

May2009009.jpg


May2009010.jpg


finished viv

vivpics003.jpg


vivpics004.jpg


vivpics005.jpg


door securing system

vivpics008.jpg


penthouse tenant, Charlie

vivpics011.jpg


Jimmy and Bea
 
Geez I wish I was talented enough to make something like that, my boyfriend HATES the look of the tanks and that is beautiful =) Nice work!
 
Thank you!

Thank you very much. We are very happy with it. We have it in our living room, so I wanted to make it nice onough to be considered a piece of furniture rather than just a snake cage. Also, this houses six snakes in 2'X2'X1'6" living quarters, plus has storage down below. Six 10g tanks would take up too much room unless you found shelves to put them on. Only problem is we want more snakes. I guess I'll be building another in the future!

If you dont have much experience with power tools, dont let that scare you. For example, JustineNYC claims she doesn't have much carpentry experience but she built a very nice viv out of a kitchen pantry. Lots of people on here have done it. Don't be afraid to give it a try.

Only problem is the plexiglass doors slid real well before the heat and humidity got to them, now they are bowing and a bit tougher to slide. I may have to get thin sheets of glass cut, but that shouldn't be to much of a problem.

Thank you again for the kind words!! Makes me feel good.
Jimmy
 
Very nice work. It is something to be proud of. Very clean looking.
And I too will never use polyshade again. I had a very hard time controlling the amount of 'shade" when applying.
I do have a few questions tho. do you have any vent/holes in your setup??
Also what are you using and where is you heat sourse??
 
Awesome job. That looks fantastic. You can add me to the list of people who'll never use polyshades again as well.

Scott
 
heat and vents...

Thank you, thank you again.

I do have vents, but not quite enough I think. I bought 3" metal vents from Lowes. I used a holesaw, drilled 3" hole and tapped them in. You can see them in the straight on pic, in the top corners. Right now I have one in each cage, but I bought two more for each I will be installing over the weekend. The reason I think I dont have enough ventilation is because my humidity is staying really high. In one of the cages it is above 70%. Here in New Mexico, it never gets that high outside, so I know it is being trapped inside. If I have to, I may drill holes along the bottom of the plexiglass doors (if I stay with them, see above), that way fresh air comes in there and provides more ventilation as it rises and goes out the back.

For heat I am using 1' long strips of 11" wide flexwatt. To regulate it all, I have a herpstat ND, which you can see on the wall in one of the pics. I love that thermostat! Admittedly, I have not used any others, but that one works geat. It usually runs at 10%. I'm no genious, but my thoughts are that I would rather have more than I need and run at a lower power that way the system is not straining to keep the temps I need. Of course, thats just my opinion, I could be wrong....

The problem I had with Polyshades was that the poly and the stain would seperate or something like that. No matter how much you stir it, when we appied it to a large surface area it would look blotchy. It did okay on the trim pieces since they aren't very big, but on the sides and top it looked horrible!! After all that work and care! You want to talk about mad?!?!? I left it alone and didn't even look at it for several days. We resanded all the large areas and applied a regular polyurethane and thank God we didn't sand through the oak plywood.

We did a search after our problem and found pages and pages of complaints about polyshades. Too bad we didn't do that before we used it, duh!

Thanks again!,
Jimmy
 
Back
Top