HerpsOfNM
My name's Blurryface...
PART I:
DISCLAIMER: Cornsnakes.com Forums, its Staff, nor myself assume no responsibility for the actions of others taken in recreating this How-to. Members, registered or not, undertaking the re-creation of this How-to perform such solely at their own risk.
“Work smarter, not harder.” Various woodworking tools can, and will be, used in constructing this rack. As such, be they manual or powered, such tools can pose a danger in use if not used mindfully and for their intended purpose(s). Personal Protective Equipment (PPE) such as hearing, eye, and/or respiratory protection may be recommended or needed.
WARNING: This is going to be long!
TOOLS (I used):
Circular saw, corded or battery powered
Rip/Guide fence for circular saw
Compound mitre saw
Drill with adjustable torque, corded or battery powered
#1 and #2 Phillips (cross-tip) screw bits
Various drill bits (twist bits: 5/64, 7/64, 9/64 and spur (wood) point bit: 3/16)
#8 and #10 countersink bits
T or L square
Tape measure with resolution of at least 1/16 inch
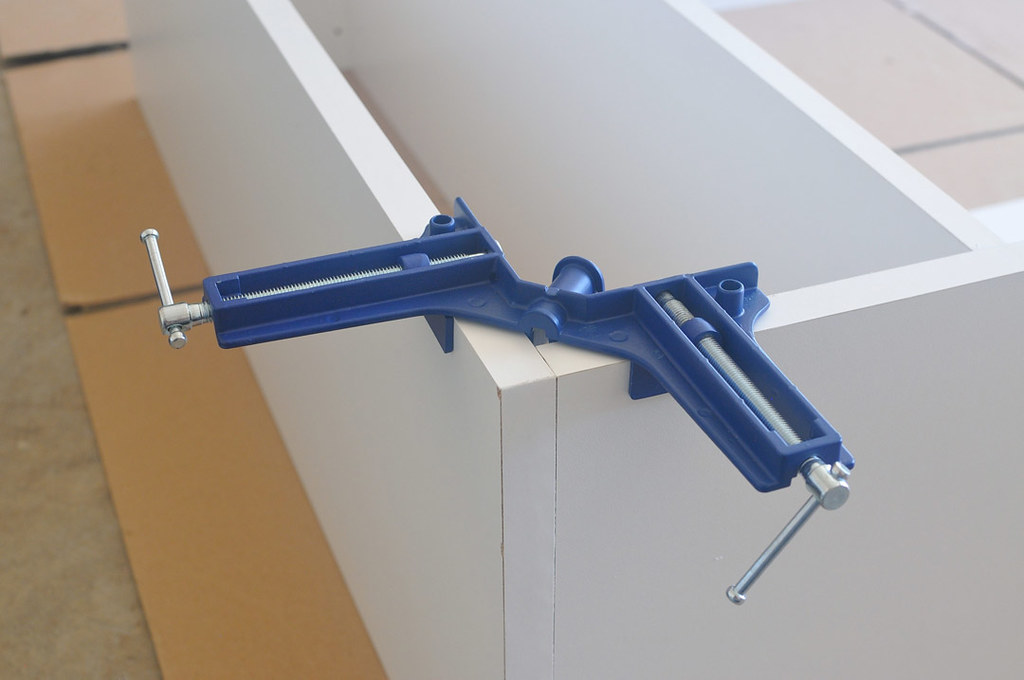
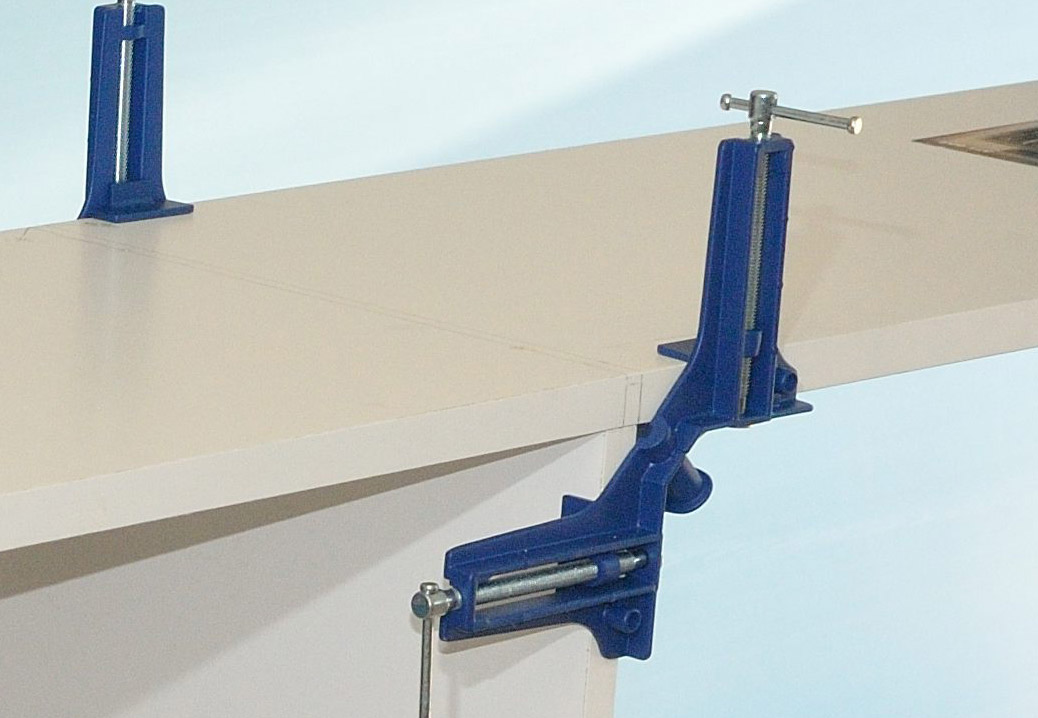
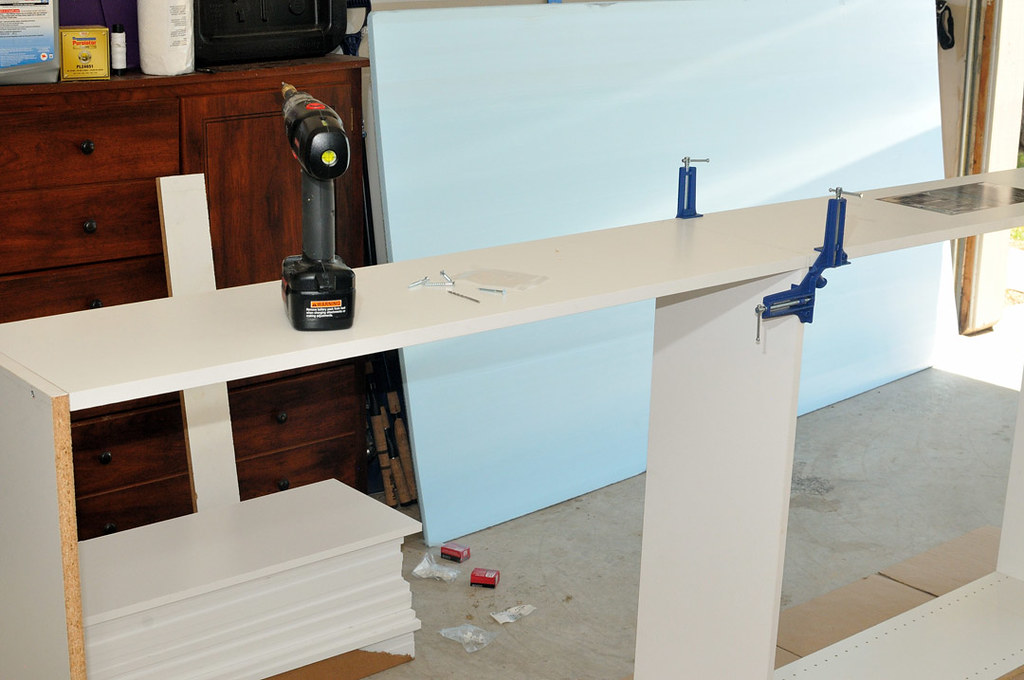
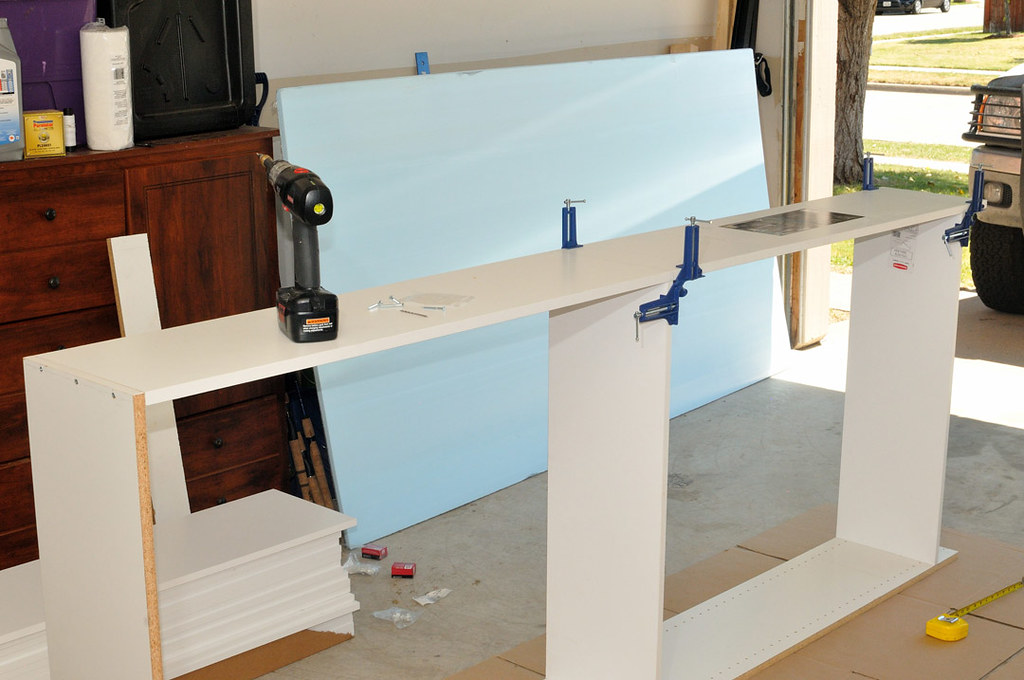
90 degree corner clamp
“Quick-Grip” or “C” style clamps
Saw horse
Clothes iron and kraft (brown butcher) paper
Work gloves
TOOLS (that may make this faster):
Table saw
Dado blade set
Various length of bar (parallel) clamps – mine were too short, personal issue :shrugs:
A full Master Carpenter arsenal/workshop
Record number (for me) of red ratsnake eggs set to start hatching in less than 2 weeks
Adult Liquid Refreshment (note: the consumption of alcohol does not guarantee better build quality, your mileage may vary…I was working in an east-facing garage in triple-digit heat, not factoring heat index, and consumed no less than 6 bottles of water while constructing this; the ALR was consumed afterwards)
Foresight (like measuring the height of the room this rack in going into BEFORE you actually build it)
MATERIALS:
2 - Melamine Shelf Pre-Drilled Board (3/4in x 11-3/4in x 97in)
20-23 - Decorative Shelf – 5/8in thick (length can vary, I used 12in x 36in, actual is 11-3/4in x 35-13/16in…manufactured length varied from just under 35-3/4in to 35-13/16in)*
1 - 4ft x 8ft x 3/16in peg board
1 – 1in x 4in x 4ft pine board (length may vary if you make a wider or narrower rack)
2 pack - 1-3/4in Melamine screw and cap (10 count/pack)
1 box - #10 x 1in wood screws
1 – 3/4in x 25ft Melamine edging
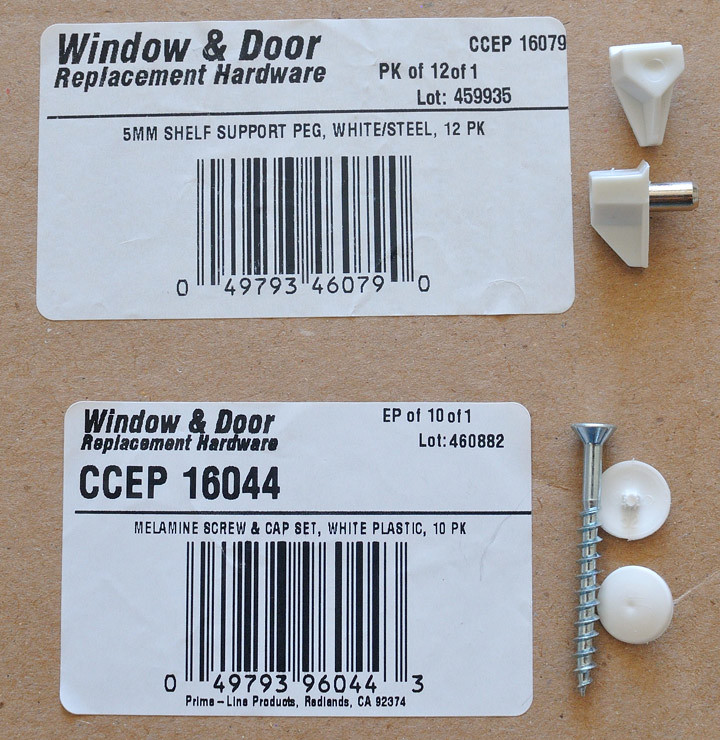
7 packs – 1/2in white shelf peg (12 count/pack, optional)*
12in bottom mount drawer slide (optional)*
Ziploc Large Rectangle Container (old style, see photos, quantities will vary)
Kroger (aka Fred Meyer, Ralph, Smith’s Food & Drug Stores, City Market, Dillons Supermarkets, Fry’s Food & Drug, etc.) Home Sense Large & Extra Large Rectangular Container (quantities will vary)
Target up&up snap and store large and extra large rectangle containers are exact same as Kroger Home Sense.
PURPOSE:
I have ran out of caging space due to purchases of additional red ratsnake mutations and holdbacks from a couple seasons. Additionally, this season will mark the first time I have the potential to produce over 100 red ratsnake hatchlings. This new rack will free-up my former hatchling rack (n=36), allowing me to utilize it as a holdback or juvenile rack. This also marks the beginning of my revitalization of my herp room, where I will be working away from keeping my “pets” in tubs and moving them into custom built display caging. Racks will become strictly a means to house and rear hatchling to sub-adult snakes or geckos.
CONSTRUCTION:
Foresight:
I mentioned Foresight within TOOLS (that may make this faster), so before we even begin shopping for supplies, measure the height of the ceiling where you plan to place this hatchling rack. Keep in mind you don’t have to use the 97in (8ft 1in) drilled melamine board. You can use shorter sections (4ft or 6ft drilled panels) possibly available within the closet aisle of any favorite hardware store (I used Lowes and Home Depot as other local [local = 15 miles or closer for me in this case] hardware and lumber stores did not carry pre-cut and drilled melamine panels/boards). Foresight…for some reason I thought my ceilings were 9ft, but instead they are 8ft – an amateur mistake, aka brain fart on my part. As such, I had to trim 7/8in off the bottom in order to finish construction and install the rack. There was another way to do this, but one way or the other the circular saw was coming out and trimming a little off each panel was the quicker option and it didn’t interfere with shelf height placement.
Planning:
This is a “smarter” version of my current hatchling rack. The idea came to me 2 years ago when buying some melamine panels, but I never really put much brain cell use to designing it. Recently the idea was brought back to the front burner while looking at Cornsnakes.com Member aleks’ Facebook page and stumbling upon one of his rack photos. My current rack, now former, instead was built to use Ziploc Large and Kroger Home Sense Extra Large Rectangle Containers by using a router to create a “through housing joint” where the rack sides were routed with a spacing slightly taller than the container, the shelf was slid into the channel created, and secured in place with melamine screws. Such joints work well when one needs to bear weight on the joint. Unfortunately, this style of rack building doesn’t lend to a modular design in allowing for manufacturer tub redesigns. This is fine if you have all the tubs you need to initially fill the rack. However, if you wind up adding tubs as you need, you might be met with changes in height in my case. Ultimately, that problem comes down to budgeting…
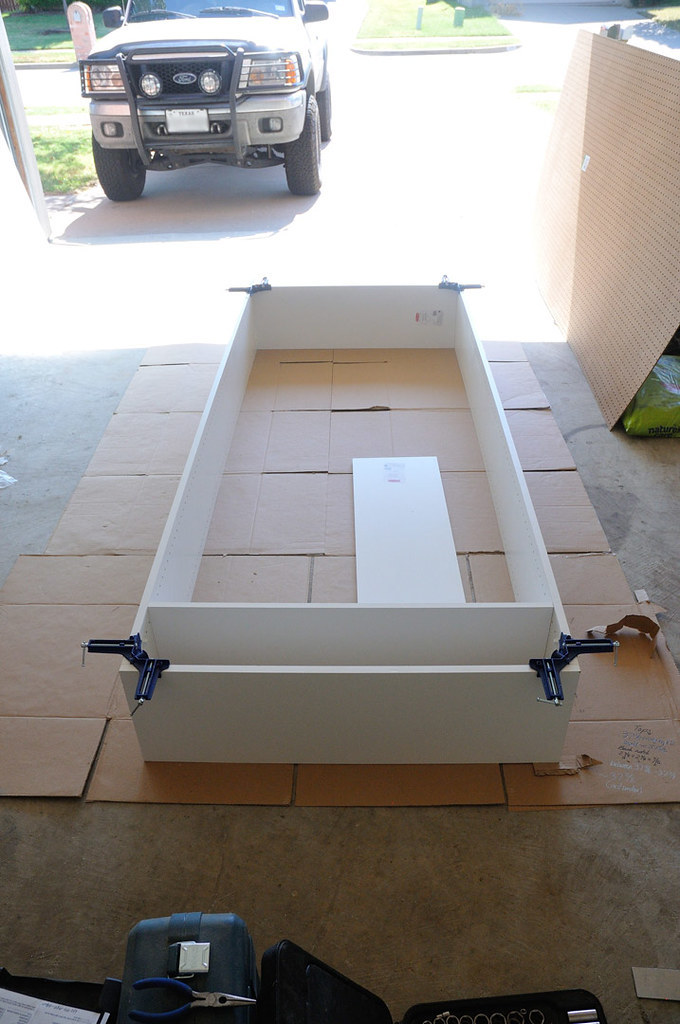
For this new rack, instead I’m doing a simple “square-ended butt joint” at all secured perpendicular contact points. Since square-ended butt joints tend to be weaker, the use of pegboard on the back of the rack lends to added rigidity by securing it into the top, bottom, and side panels to keep the entire unit square. In keeping with the use of the Ziploc and Kroger containers and then seeing aleks’ rack an “oh really” moment popped.
These containers measure as follows, with lids in place:
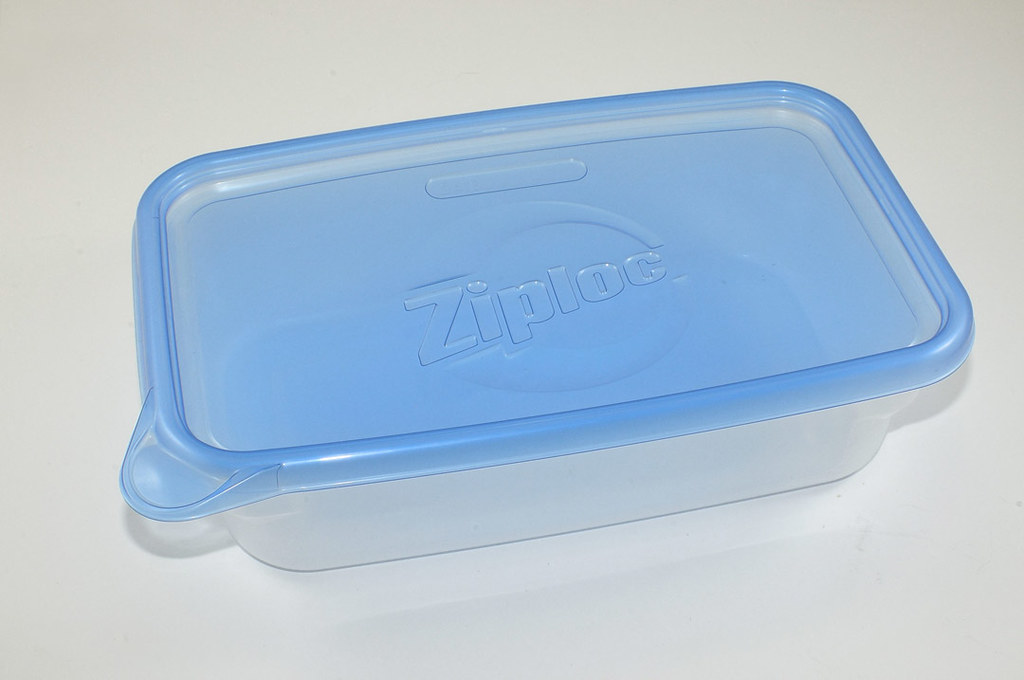
Ziploc (old style) 9.5cup/76oz/2.25L Large Rectangle Container – 11.5in x 7.25in x 3.125in (L x W x H)
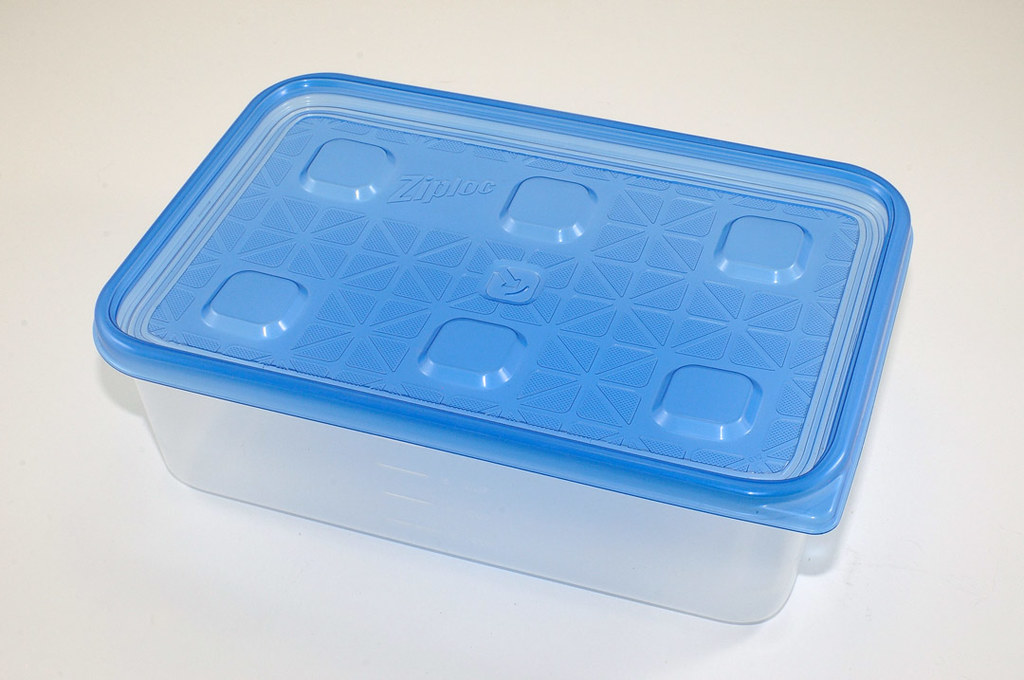
Ziploc (new style) 9.0cup/72oz/2.12L Large Rectangle Container – 10in x 6.75in x 3.1875in
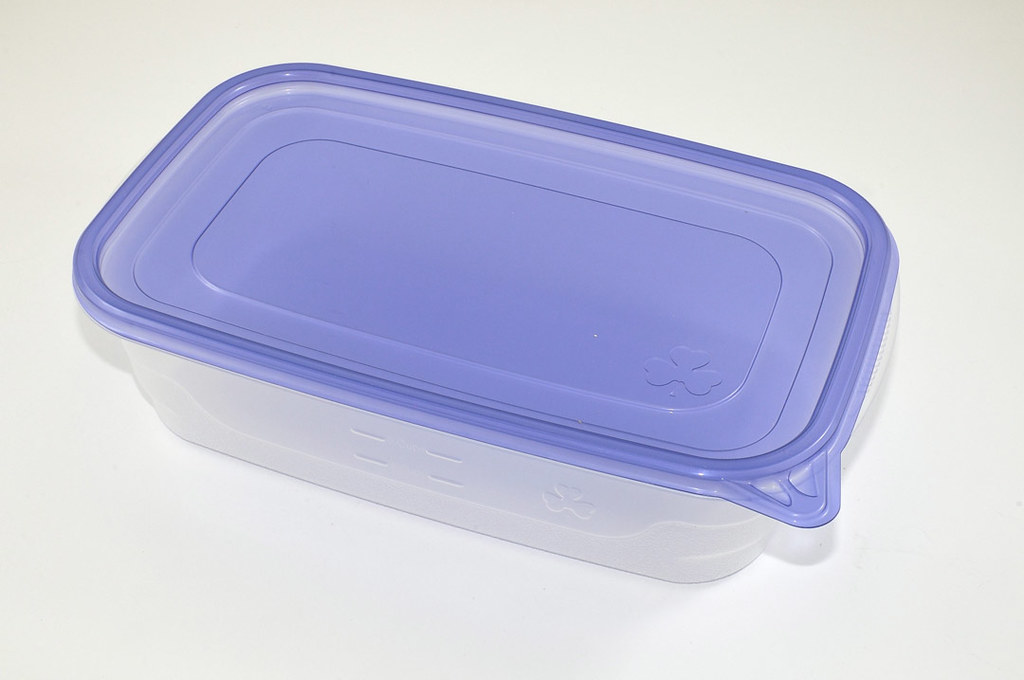
Kroger Home Sense Extra Large Rectangular Container – 13.25in x 9.25in x 3.0625in
Kroger Home Sense Large Rectangular Container – 11.5625in x 7in x 3.0625in
In aleks’ photo I could see the sides of his rack were drilled. Having these measurements, I went to Lowes and Home Depot to find the pre-drilled panels. Lowes, at least here, only carries what they call Thermally Fused Laminate (aka melamine), the pre-drilled panel is 15.75in x 97in x 0.75in and the hole spacing is just over 1.25in (actual hole spacing in 32mm or 1.25984in). On the other hand, Home Depot carries 2 versions of the pre-drilled panel. One is 11.75in deep and the other is 15.75in deep. I would have preferred the 15.75in deep, but neither Lowes nor Home Depot stock a precut shelf that in 5/8in (0.625in) thick and 15.75in deep. Both stores only carry 3/4in thick shelves that are also 15.75in deep.
The reasoning for 5/8in thick shelving was 1) the placement of this rack couldn’t go wider than 44 inches so I could get away with a thinner shelf without worrying of sagging, 2) it’s lighter, 3) shelf height spacing, and 4) it’s cheaper than 3/4in thick panels/shelves. The really cheaper option would have been 1/2in or 5/8in thick 4ft x 8ft 2-sided melamine board, but no one in the south-central portion of the Dallas-Ft. Worth metro seems to carry that. Going that route also comes with the time consuming need to have to cut each shelf from the 4ft x 8ft board (10 total if you stay to 11.75x36in wide shelves). So the dilemma becomes one of cost vs convenience and since I don’t own a table saw yet, ripping 4ft x 8ft boards becomes very laborious and time consuming. Point 3 of shelf height plays into the combination of container height and pre-drilled hole spacing. Since we know that the holes are spaced just over 1.25in, every 3rd hole gives a shelf height of 3.75in. This minus the shelf thickness of 0.625in = 3.125, but actual winds up at 3 x 1.25984 = 3.77952 – 0.625 = 3.15452, which is just over 3-1/8in (3.125in). This allows for perfect fitment of the Ziploc (old style) and both Kroger containers! The use of 3/4in thick shelves would not allow for this. From there, if using the Ziploc and Kroger Large Containers, one can fit 5 containers across each shelf if using a 36in wide shelf.
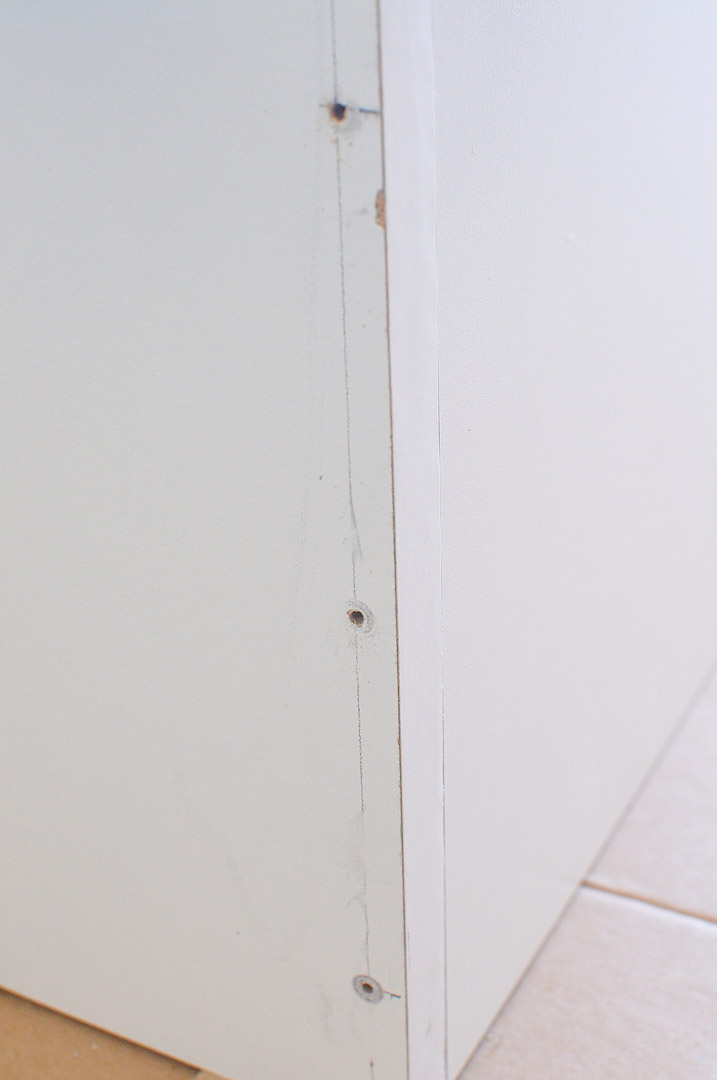
Using the 8ft drilled panels, there are 75 holes top to bottom, 150 total (front and back holes). However, when reading reviews on the panels it became obvious that there was potential for no 2 panels being alike in hole placement (bring a T-square with you to check hole alignment). Some users commented on the holes being 1/4in off, but I think these reviewers overlooked measuring the hole distance. Hole distance = If you lay each 8ft panel down with the holes facing up such that the holes become oriented left to right, the measured distance from the left panel end to 1st hole is different than the measured distance of right panel end to 1st hole. I opted to use the greatest distance from panel end to 1st hole as the top. The downside to this, as would be using the shorter distance as the top, is that each panel only has 1 orientation. These panels only have 1 of the long sides covered in melamine edging to yield a finished look. In order for the holes to mirror each other results in having the mirroring panel showing the unfinished, non-edged long side. I didn’t take photos, but all you need is a roll of melamine edging, an iron, and something to protect the iron face from the glue of the melamine edging – just simply line it up and iron away, then carefully trim excess with a utility knife.
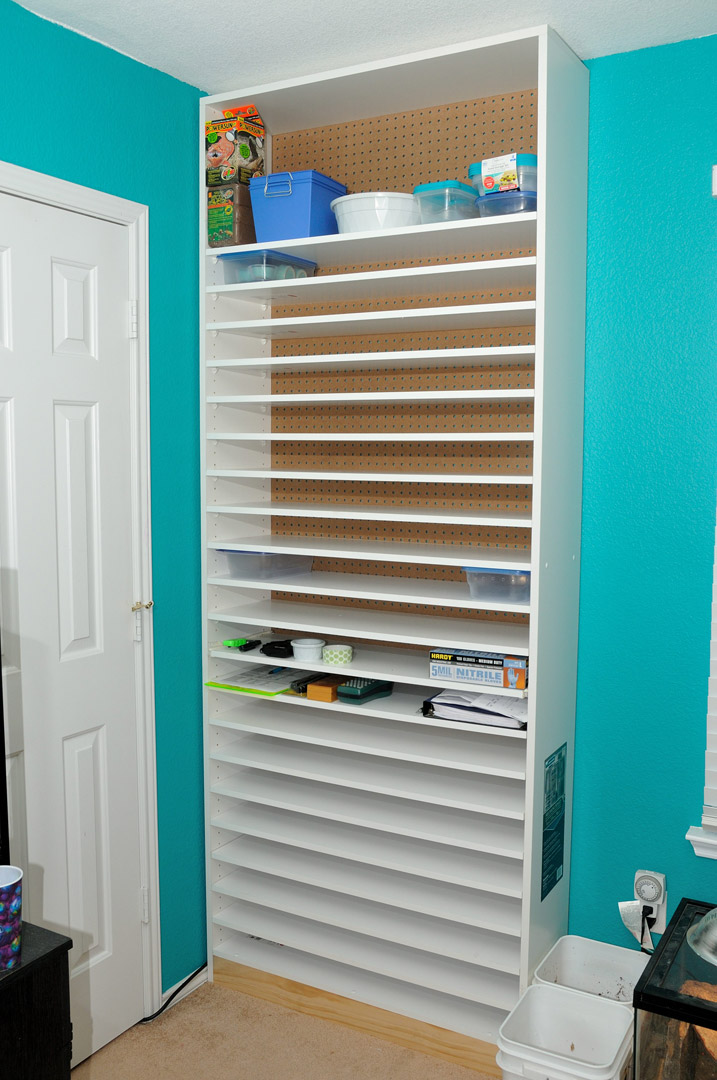
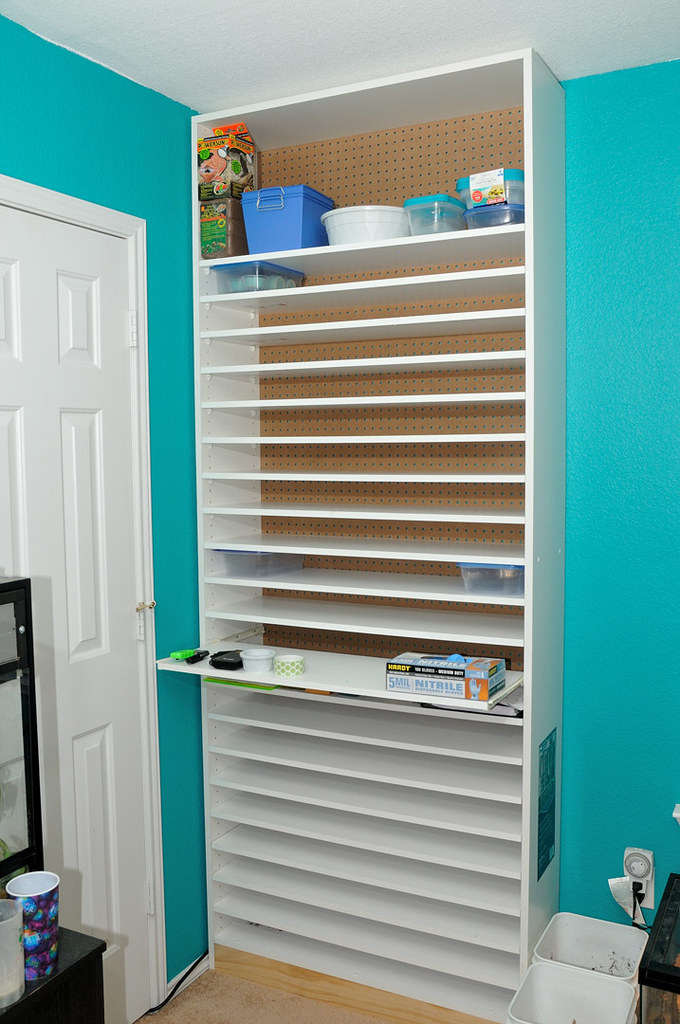
Knowing these variables, one can then use shelf pegs spaced every 3rd hole (going from the top, the first peg starts at the 4th hole due to how the panels are pre-drilled, but rest are every 3rd). Doing this will yield 24 shelves. If one does 36in wide (5 containers) x 24 shelves = 120 containers for hatchlings! 8ft is TALL though, again foresight. I’m 5ft 6in and would need a step stool to reach the top 4 shelves. Instead I’ve left this space open and use the very top shelf for storage. Additionally, something I like from aleks’ rack was the inclusion of a sliding shelf. This is optional. I installed one and placed it at approximately 38in height, keeping my shelf spacing intact. If I recall 36.25 inches high is the ergonomic height for the likes of kitchen and bathroom counters. Obviously one can place this higher or lower based upon what is comfortable for you. This slide out shelf and the shelf below it will be used for storage of things like a small digital scale, nitrile gloves, feeding record book, etc, with the slide out shelf most likely functioning as my feeding station for the rack. Since this shelf slides, the shelf below runs the risk of containers sliding off as you pull it out. Again, this is optional and one can always just keep the shelf in place if the cage spacing is needed.
DISCLAIMER: Cornsnakes.com Forums, its Staff, nor myself assume no responsibility for the actions of others taken in recreating this How-to. Members, registered or not, undertaking the re-creation of this How-to perform such solely at their own risk.
“Work smarter, not harder.” Various woodworking tools can, and will be, used in constructing this rack. As such, be they manual or powered, such tools can pose a danger in use if not used mindfully and for their intended purpose(s). Personal Protective Equipment (PPE) such as hearing, eye, and/or respiratory protection may be recommended or needed.
WARNING: This is going to be long!
TOOLS (I used):
Circular saw, corded or battery powered
Rip/Guide fence for circular saw
Compound mitre saw
Drill with adjustable torque, corded or battery powered
#1 and #2 Phillips (cross-tip) screw bits
Various drill bits (twist bits: 5/64, 7/64, 9/64 and spur (wood) point bit: 3/16)
#8 and #10 countersink bits
T or L square
Tape measure with resolution of at least 1/16 inch
90 degree corner clamp
“Quick-Grip” or “C” style clamps
Saw horse
Clothes iron and kraft (brown butcher) paper
Work gloves
TOOLS (that may make this faster):
Table saw
Dado blade set
Various length of bar (parallel) clamps – mine were too short, personal issue :shrugs:
A full Master Carpenter arsenal/workshop
Record number (for me) of red ratsnake eggs set to start hatching in less than 2 weeks
Adult Liquid Refreshment (note: the consumption of alcohol does not guarantee better build quality, your mileage may vary…I was working in an east-facing garage in triple-digit heat, not factoring heat index, and consumed no less than 6 bottles of water while constructing this; the ALR was consumed afterwards)
Foresight (like measuring the height of the room this rack in going into BEFORE you actually build it)
MATERIALS:
2 - Melamine Shelf Pre-Drilled Board (3/4in x 11-3/4in x 97in)
20-23 - Decorative Shelf – 5/8in thick (length can vary, I used 12in x 36in, actual is 11-3/4in x 35-13/16in…manufactured length varied from just under 35-3/4in to 35-13/16in)*
1 - 4ft x 8ft x 3/16in peg board
1 – 1in x 4in x 4ft pine board (length may vary if you make a wider or narrower rack)
2 pack - 1-3/4in Melamine screw and cap (10 count/pack)
1 box - #10 x 1in wood screws
1 – 3/4in x 25ft Melamine edging
7 packs – 1/2in white shelf peg (12 count/pack, optional)*
12in bottom mount drawer slide (optional)*
Ziploc Large Rectangle Container (old style, see photos, quantities will vary)
Kroger (aka Fred Meyer, Ralph, Smith’s Food & Drug Stores, City Market, Dillons Supermarkets, Fry’s Food & Drug, etc.) Home Sense Large & Extra Large Rectangular Container (quantities will vary)
Target up&up snap and store large and extra large rectangle containers are exact same as Kroger Home Sense.
PURPOSE:
I have ran out of caging space due to purchases of additional red ratsnake mutations and holdbacks from a couple seasons. Additionally, this season will mark the first time I have the potential to produce over 100 red ratsnake hatchlings. This new rack will free-up my former hatchling rack (n=36), allowing me to utilize it as a holdback or juvenile rack. This also marks the beginning of my revitalization of my herp room, where I will be working away from keeping my “pets” in tubs and moving them into custom built display caging. Racks will become strictly a means to house and rear hatchling to sub-adult snakes or geckos.
CONSTRUCTION:
Foresight:
I mentioned Foresight within TOOLS (that may make this faster), so before we even begin shopping for supplies, measure the height of the ceiling where you plan to place this hatchling rack. Keep in mind you don’t have to use the 97in (8ft 1in) drilled melamine board. You can use shorter sections (4ft or 6ft drilled panels) possibly available within the closet aisle of any favorite hardware store (I used Lowes and Home Depot as other local [local = 15 miles or closer for me in this case] hardware and lumber stores did not carry pre-cut and drilled melamine panels/boards). Foresight…for some reason I thought my ceilings were 9ft, but instead they are 8ft – an amateur mistake, aka brain fart on my part. As such, I had to trim 7/8in off the bottom in order to finish construction and install the rack. There was another way to do this, but one way or the other the circular saw was coming out and trimming a little off each panel was the quicker option and it didn’t interfere with shelf height placement.
Planning:
This is a “smarter” version of my current hatchling rack. The idea came to me 2 years ago when buying some melamine panels, but I never really put much brain cell use to designing it. Recently the idea was brought back to the front burner while looking at Cornsnakes.com Member aleks’ Facebook page and stumbling upon one of his rack photos. My current rack, now former, instead was built to use Ziploc Large and Kroger Home Sense Extra Large Rectangle Containers by using a router to create a “through housing joint” where the rack sides were routed with a spacing slightly taller than the container, the shelf was slid into the channel created, and secured in place with melamine screws. Such joints work well when one needs to bear weight on the joint. Unfortunately, this style of rack building doesn’t lend to a modular design in allowing for manufacturer tub redesigns. This is fine if you have all the tubs you need to initially fill the rack. However, if you wind up adding tubs as you need, you might be met with changes in height in my case. Ultimately, that problem comes down to budgeting…
For this new rack, instead I’m doing a simple “square-ended butt joint” at all secured perpendicular contact points. Since square-ended butt joints tend to be weaker, the use of pegboard on the back of the rack lends to added rigidity by securing it into the top, bottom, and side panels to keep the entire unit square. In keeping with the use of the Ziploc and Kroger containers and then seeing aleks’ rack an “oh really” moment popped.
These containers measure as follows, with lids in place:
Ziploc (old style) 9.5cup/76oz/2.25L Large Rectangle Container – 11.5in x 7.25in x 3.125in (L x W x H)
Ziploc (new style) 9.0cup/72oz/2.12L Large Rectangle Container – 10in x 6.75in x 3.1875in
Kroger Home Sense Extra Large Rectangular Container – 13.25in x 9.25in x 3.0625in
Kroger Home Sense Large Rectangular Container – 11.5625in x 7in x 3.0625in
In aleks’ photo I could see the sides of his rack were drilled. Having these measurements, I went to Lowes and Home Depot to find the pre-drilled panels. Lowes, at least here, only carries what they call Thermally Fused Laminate (aka melamine), the pre-drilled panel is 15.75in x 97in x 0.75in and the hole spacing is just over 1.25in (actual hole spacing in 32mm or 1.25984in). On the other hand, Home Depot carries 2 versions of the pre-drilled panel. One is 11.75in deep and the other is 15.75in deep. I would have preferred the 15.75in deep, but neither Lowes nor Home Depot stock a precut shelf that in 5/8in (0.625in) thick and 15.75in deep. Both stores only carry 3/4in thick shelves that are also 15.75in deep.
The reasoning for 5/8in thick shelving was 1) the placement of this rack couldn’t go wider than 44 inches so I could get away with a thinner shelf without worrying of sagging, 2) it’s lighter, 3) shelf height spacing, and 4) it’s cheaper than 3/4in thick panels/shelves. The really cheaper option would have been 1/2in or 5/8in thick 4ft x 8ft 2-sided melamine board, but no one in the south-central portion of the Dallas-Ft. Worth metro seems to carry that. Going that route also comes with the time consuming need to have to cut each shelf from the 4ft x 8ft board (10 total if you stay to 11.75x36in wide shelves). So the dilemma becomes one of cost vs convenience and since I don’t own a table saw yet, ripping 4ft x 8ft boards becomes very laborious and time consuming. Point 3 of shelf height plays into the combination of container height and pre-drilled hole spacing. Since we know that the holes are spaced just over 1.25in, every 3rd hole gives a shelf height of 3.75in. This minus the shelf thickness of 0.625in = 3.125, but actual winds up at 3 x 1.25984 = 3.77952 – 0.625 = 3.15452, which is just over 3-1/8in (3.125in). This allows for perfect fitment of the Ziploc (old style) and both Kroger containers! The use of 3/4in thick shelves would not allow for this. From there, if using the Ziploc and Kroger Large Containers, one can fit 5 containers across each shelf if using a 36in wide shelf.
Using the 8ft drilled panels, there are 75 holes top to bottom, 150 total (front and back holes). However, when reading reviews on the panels it became obvious that there was potential for no 2 panels being alike in hole placement (bring a T-square with you to check hole alignment). Some users commented on the holes being 1/4in off, but I think these reviewers overlooked measuring the hole distance. Hole distance = If you lay each 8ft panel down with the holes facing up such that the holes become oriented left to right, the measured distance from the left panel end to 1st hole is different than the measured distance of right panel end to 1st hole. I opted to use the greatest distance from panel end to 1st hole as the top. The downside to this, as would be using the shorter distance as the top, is that each panel only has 1 orientation. These panels only have 1 of the long sides covered in melamine edging to yield a finished look. In order for the holes to mirror each other results in having the mirroring panel showing the unfinished, non-edged long side. I didn’t take photos, but all you need is a roll of melamine edging, an iron, and something to protect the iron face from the glue of the melamine edging – just simply line it up and iron away, then carefully trim excess with a utility knife.
Knowing these variables, one can then use shelf pegs spaced every 3rd hole (going from the top, the first peg starts at the 4th hole due to how the panels are pre-drilled, but rest are every 3rd). Doing this will yield 24 shelves. If one does 36in wide (5 containers) x 24 shelves = 120 containers for hatchlings! 8ft is TALL though, again foresight. I’m 5ft 6in and would need a step stool to reach the top 4 shelves. Instead I’ve left this space open and use the very top shelf for storage. Additionally, something I like from aleks’ rack was the inclusion of a sliding shelf. This is optional. I installed one and placed it at approximately 38in height, keeping my shelf spacing intact. If I recall 36.25 inches high is the ergonomic height for the likes of kitchen and bathroom counters. Obviously one can place this higher or lower based upon what is comfortable for you. This slide out shelf and the shelf below it will be used for storage of things like a small digital scale, nitrile gloves, feeding record book, etc, with the slide out shelf most likely functioning as my feeding station for the rack. Since this shelf slides, the shelf below runs the risk of containers sliding off as you pull it out. Again, this is optional and one can always just keep the shelf in place if the cage spacing is needed.
")