• Hello!

    Either you have not registered on this site yet, or you are registered but have not logged in. In either case, you will not be able to use the full functionality of this site until you have registered, and then logged in after your registration has been approved.

    Registration is FREE, so please register so you can participate instead of remaining a lurker....

    Please be certain that the location field is correctly filled out when you register. All registrations that appear to be bogus will be rejected. Which means that if your location field does NOT match the actual location of your registration IP address, then your registration will be rejected.

    Sorry about the strictness of this requirement, but it is necessary to block spammers and scammers at the door as much as possible.

Finally my homemade rack

pgr8dnlvr

An obsolete oldie...
Finally the two racks I have been working on for a loooooooooong time are done! I don't have pics of the second rack but it is identical to the first but with 12 sweater boxes 23X16X6. There will also be a number of sandwich type containers that will hold up to 24 hatchlings...


Looks good!

Just one question: I thought that you were only supposed to cut 11" flexwatt alont the dotted lines between each section, is it ok to cut it wherever you want to?
 
:-offtopic SOrry, but I couldn't read this thread without laughing! This is possibly the only instance where people can tell someone "Nice rack" and "Great looking rack you've got there" without getting slapped! :grin01:


Nice rack, by the way.
 
Very nice indeed. That looks like it took a little bit of time and a lot of patience. Nice work!
 
Thanks so much for the kind words guys! Yes, I did work VERY hard on this sucker. Most people build racks to help LESSEN the cost of housing, not me. LOL! When all was said and done for the two racks $773 :sidestep:

Luckily the actual "rack part" was a SCREAMING deal due to the fact that hubby manages a furniture manufacturing place. So it is all solid pine high grade wood and he did all the "fancy pants" extras just because that is the way a book shelf is made at his shop. I imagine there could be about $400 in wood in these racks. I was a little disappointed that the crew didn't measure things properly though as the plan was to have a lidless rack and not only did they not get the exact distance between shelves right they also messed up on the dimensions front to back so there is about half an inch or so overhang in the front. All ended well though because it looks just fine with the lids on :)

I definitely have tips for people who are like me and not really experienced in building these types of things.. I will break it up into different posts though. lol.

Rebecca
 
diamondlil said:
oh even nicer.................is the second snake a snow or blizzard?

It's a nice clean 3 year old male snow! He has done a good job this year and fathered 3 clutches for me! They should start hatching in about a week :)

Further down you will see a pic of my blizzard, who has the very faintest pattern which is quickly disappearing. The funny thing is about half the people <including me> think he is a Motley? Blizzard!!! :) Who knows, he is a pet store find so no guarantees can't wait to start testing him out though!

Rebecca
 
blueapplepaste said:
Looks good!

Just one question: I thought that you were only supposed to cut 11" flexwatt alont the dotted lines between each section, is it ok to cut it wherever you want to?

I asked a number of experienced people on this one and they all said it was fine to cut it wherever you want, HOWEVER you must be certain to cover the entire cut section with electricians tape to make sure no elements are exposed which might cause shorts, fires, or other problems.

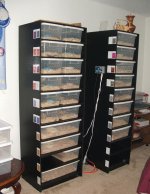
I have been running the racks for three days now and all seems just fine. I am using a Johnston thermostat on one, and a cheap ESU thermostat on the other. I am having problems so far with even heat distribution. I was warned that there would be a differnce of three to five degrees from top bins compared to bottom but it is really wacky the differences I'm getting.

I thankfully have everything easily removable as far as construction though, ie. shelves are on shelf pegs so they are easy to pull out. Pegboard is in slots but not attached, the heat tape is tacked on with finishing nails <don't worry I know to put them only on the very edges in the clear plastic part!> So I may have to try things like getting a solid back and line everything with foil tape or something. If anyone has any suggestions I'm all ears!

I know I was agonizing over weather to go with belly heat or not. I may have made the wrong decision, but it seems like everyone was evenly split on which heat method is better. With it on the back though it was a tad cheaper, no risk of dragging bins above the tape over and over, and much easier to wire up. We'll see if I can fiddle with things and get it right!

I highly recommend checking out Paul Sage's website <I can post the address if anyone needs it> for learning about wiring up heat tape. Although it was a time consuming project I really didn't find it as daunting as I thought I would! ;)

Rebecca
 
Roy Munson said:
That may be the nicest looking rack I've seen. :grin01:

Beautiful inhabitants too. :)


THANKS! Means so much coming from one of my "online" heros! lol :)

Wonder if I should post pictures of my "OTHER" rack........... :sidestep: rotflmao !!! :)

I want to see more pictures of your set ups and get any advice you may have to give me! ;) I hope to purchase from you sometime too!
 
pgr8dnlvr said:
THANKS! Means so much coming from one of my "online" heros! lol :)
What a nice thing to say. But compared to the likes of some of our other members, I really don't deserve to be anyone's "online" hero. :eek:

Wonder if I should post pictures of my "OTHER" rack........... :sidestep: rotflmao !!! :)
Hey! As long as you don't jeopardize your "furniture connection" (hubby). ;)

I want to see more pictures of your set ups and get any advice you may have to give me! ;) I hope to purchase from you sometime too!
I probably won't be producing anything really cool until 2008. :awcrap: I have 2 pairs of AP racks, each pair in a different room. Here's a pic of one of the pairs. :)
 

Attachments

  • 101505 racks.JPG
    101505 racks.JPG
    53.5 KB · Views: 67
I fed all my guys for the first time last night and I was pretty pleased with the time, it took me about an hour to 1 1/2 hours. I know I waste time because I put them in seperate feeding tubs and can only feed in batches of three or four at once, I also tend to handle them a little bit before feeds sometimes.. I have 24 at home right now, the rest I co own and are at my partners house.

Anyway point is, can people state how many snakes they have and how long it takes to feed?

Rebecca
 
Nice!

Way to go Rebecca! You are right, most people go for ease and cost. I have some purchased and two that I made. The ones I made, I like a whole lot more because I put them on rollers so I can access the back and underneath.

As far as time feeding, mine are done on different nights because of the age difference in my snakes. Meaning, the hatchlings get fed more often than the Adults. I typically feed the bulk of my snakes twice a week and feeding is less than an hour once the mice are thawed and warmed or picked out of nests.

I have 28 snakes. I think. :bang: LoL - I am fostering two snakes and my local pet store has me working on feeding her Lav King that won't eat for her. SO give or take 3 hehe.

Again, great job!!

-Tonya
 
Back
Top