• Hello!

    Either you have not registered on this site yet, or you are registered but have not logged in. In either case, you will not be able to use the full functionality of this site until you have registered, and then logged in after your registration has been approved.

    Registration is FREE, so please register so you can participate instead of remaining a lurker....

    Please be certain that the location field is correctly filled out when you register. All registrations that appear to be bogus will be rejected. Which means that if your location field does NOT match the actual location of your registration IP address, then your registration will be rejected.

    Sorry about the strictness of this requirement, but it is necessary to block spammers and scammers at the door as much as possible.

Our first rack

Jay@PJCReptiles

"Quality Before Quantity"
Hi Everyone,
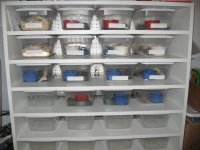
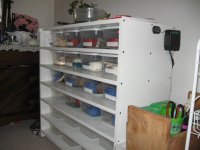
I have just finished our first of three rack systems for our upcoming babies. It really wasn't as expensive as I thought it would be. Total cost with heat melamine, heat tape, rheostat, thermometer, peg board, bins and hardware was about $150.00 (the heat tape being the most costly). I used precut and pre-edged, 36"x16"x3/4" melamine so there was no cutting involved which made assembley very easy. Took me about 2 1/2 hours from start to finish with running the heat tape and wiring it being the longest of the steps. I put the probes from the rheostat and thermometer in the middle of the center shelf and it runs perfect from 83 - 86 degrees. It is 3'x3'x16" and holds 24 sterlite shoe box bins. Here is a couple pictures tell us what you think.
Thanks,
Jay & PJ :cool:
 

Attachments

  • rack2.JPG
    rack2.JPG
    51.3 KB · Views: 279
  • rack4.JPG
    rack4.JPG
    46.1 KB · Views: 272
Hi Tanya

I got the precut melamine at Home Depot. It was perfect as I built the rack without cutting a thing except the peg board for the back. Thanks for looking.
Jay & PJ :cool:
 
Everyone else pretty much summed it up - Great Job!!

I like the idea of using the pre cut boards. I'm going to prob build a rack this summer and am just going to use that idea I think to make things easier!
 
Awesome-possum!

Our first shelf wasn't nearly as neat looking as yours, but it was our learning-experience. :) Although, I may just stea ... um, borrow the pre-cut shelving idea so we can put the next one out "in public."
 
Looks really nice!!! I like the pre-cut pre-edged idea. All my racks were made from 4' x 8' sheets of melamine. So, the cut areas show on the front of the shelves. I bought melamine edging and started to iron it on, but didn't like trimming it (since the product is slightly wider than the shelves). So, my snake racks definitely don't have your nice, professional look. Great job!!
 
Oops... posted under Hubby's account. Anyway... very nice, professional look to your snake rack. Great job!
 
Nice Rack! lol
You're braver then me. I'm scared of electrics. Great job. :cheers:
BTW, I'm getting an amber girl finally! Woo hoo!
 
It looks awesome! Any possibilities of showing us how you wired your heat tape up? By the way do you have your probe in one of the sterilites to get an acurate temp inside or do you just have the probes near the heat tape?

Rebecca
 
Thanks for all the comments guys. We appreciate it. pgr8dnlvr , I taped the probes directly to the heat tape in the center of the middle shelf. I don't think I had to place the probes in one of the bins as the heat becomes radiated and a good thermal gradient is maintained. I think there wouldn't be more then a degree or two difference of temps inside and outside the bins. The rheostat maintains temps at about 83 - 86 degrees. The heat tape wasn't that hard. I don't like the connectors they provide as they are kind of bulky. All I did was take the soldering iron and gently rub away the plastic coating on the contacts of the heat tape (you will feel the difference in texture when you make good cantact with the metel inside the tape). Then I soldered the wires onto the tape then covered the connection with black tape. We make heatpads this way too. I will build a pad later after work and take pictures of step-by-step for you. It is very easy actually. Again...thanks for looking all.
Jay & PJ :cool:
 
B.T.W. Captain.....My wife said the same thing....lol . And now thanks to the racks we are building she has a ton of room for more.
Jay & PJ :cool:
 
Last edited:
Did you get your plans from finegtps.com ?

Did you get the plans from this guys site? http://www.finegtps.com/Racks.htm If so, I have downloaded a copy of that, but If not let me know where you got them so I can get a copy to build mine if we decide to go into breeding.

We are really thinking about breeding some time in the future, but that is a long way off, by that I mean probably 2 years. I want to research first.

But you know how websites go, if you don't download a copy of the plans now the dang websites are gone when you want to start on a project. Let me know the link to your plans, pretty please, so I can download it for when we start ours.

Thanks :wavey:
 
Hi Mom,
Very nice detailed plans you have there. I did not use those plans though....lol. I did some measuring of the bins I wanted to use (Sterlite 14" x 7 3/4" x 4 3/4 w/ lid) then went shopping for materials. It just so happened that my local Home Depot had pre-cut / pre-edged 36" x 16" x 3/4 " melamine.
I had no drawings to go by I just pictured what I wanted for a rack and built it. With the material I used it was perfect as I had no cutting to do except for the peg board. The most work involved was running and wiring the FlexWatt heat tape. The plans you show uses some kind of heat rope. I have had a few inquiries about how I built it. I will be building two (2) more so I guess I will have to do step-by-step detailed instructions with pictures so everyone can use them. I was really surprised how easy they were to assemble. The link you supplied was very nice but there was a lot more involved then what I have built. I used minimal tools (jig saw, screw gun, hammer, soldering iron, tape measure) I think it took me all of three (3) hours from start to finish. That's what I will do. I will make a tutorial and post it on our site www.pjcreptiles.com so it can be available to anyone who needs it. I will be building our next one in the next couple of days.
Jay & PJ :cool:
P.S. Mom, you can E-Mail us at anytime with questions at [email protected]
 
Thanks. Yours looked so similar but, by your description, seemed a whole heck of a lot easier to make, so I wasn't sure if you used all that stuff he used or not.

I was hoping you had your own design you would post because I do not have all those fancy tools that guy has lol, and I would like to print out the designs or directions to put in my file for future reference.

I can't tell you how many times I have come across a site that had something on it I wanted to build or do and when I finally got around to doing it the site was gone..grrrr! So even though I end up spending a fortune on ink cartridges, lol, I try to print stuff out as soon as I find it.

Can't wait to see the pics
 
ok i know its heated by the uth tape.....but whats the light set up for the rack...im looking into getting/ building one......but what kind of light setups are there for them.........?
 
Back
Top